Secure copy or SCP is a command-line utility that allows users to transfer files and directories securely from one machine to another over SSH protocol.
SCP is handy as it is easy to use. Some of the features of using SCP to transfer files over remote hosts include:
- File and directory transfer gets implemented over SSH, thereby improving security,
- It supports bidirectional copy. i.e., can transfer files and directories to and from a remote host.
- It is part of the OpenSSH package and therefore does not require a separate package installation.
For this tutorial, we shall walk through how to copy files and directories recursively using SCP. Using SCP will speed up the file and directory transfer.
SCP Basic
Before we illustrate how to copy files and directories recursively, let’s go over some basic SCP. Feel free to skip to the section you need.
The general syntax for the SCP command is:
scp [OPTION] user@src_ip:src_filename user@dst_ip:dst_filename
We start by calling the SCP command.
- Next, we specify the options which allow us to modify the basic behavior of the command. Supported options include custom SSH port, recursive copy, identity file, and such.
- Next, we set the source file name.
- Finally, we set the destination file name.
NOTE: Ensure to set the username and host for remote files.
Example 1 – Copy Remote File to Local
The following are examples of how you can copy files to and from remote machines using the SCP command:
Before we begin:
- Ensure you have SSH access to the remote host (use either an SSH key or a password).
- Ensure you have the read permission on the file and directories you need to copy and write permissions on the destination system.
To copy a file or directory from a remote machine to a local machine, we need to specify the remote machine as the source and the local machine as the destination system.
For example, I have a backup file.zst (Learn how to use zst) on a remote CentOS server, and I need to download it to my Local Fedora machine. In that case, I can do:
scp centos@192.168.0.20:/home/centos/Downloads/backup.zst /home/fedora/Downloads

Once I execute the above command, SCP will prompt me for an SSH password to the CentOS server and download the backup.zst file to my local downloads folder.
Example 2 – Copy Local File to Remote Host
Similarly, I can transfer a local file to a remote host using SCP.
For example, to transfer a file called backup.zip from my Fedora machine to my CentOS server, I can do:
scp /home/fedora/Documents/backup.zip centos@192.168.0.20:/home/centos/Documents

In this case, we copy the backup.zip file from my Documents folder to the Documents folder of my CentOS machine.
It is good to explicitly specify the remote directory where you will transfer the file to… If not specified, SCP stores files in the remote user home directory.
Example 3 – SCP on Non-Default Port
If you are running SSH on a non-default port (22), you can specify the port using the -P flag.
To learn how to find the port on which SSH is running, check out the link below:
https://linuxhint.com/find-running-ssh-port/
Suppose SSH is running on port 3090, I can use the command:
scp -P 3090 backup.zst centos@192.168.0.20 :/home/centos/Downloads/
This copies the file to the remote host but using a non-default SSH port.
How to Recursively Copy Files and Directories
If you want to recursively copy files and directories from or to a remote host using SCP, you need to specify the -r flag.
For example, suppose I want to get all the log files from the CentOS server to my local machine. In that case, I can run the command:
sudo scp -r root@192.168.0.20:/var/log /logs
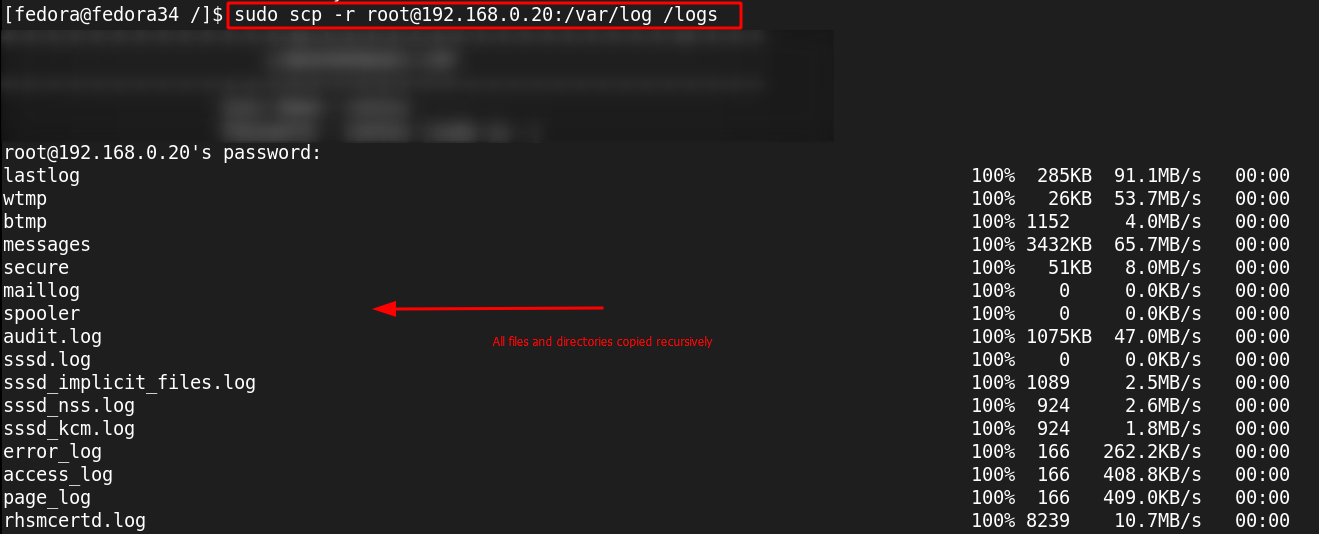
You will notice that I used the root account for my CentOS server. That’s because the /var/log directory is only restricted to the root user.
Once completed, the entire files and directories inside the /var/log directory will be transferred to the/logs directory on my local machine.
Conclusion
In this guide, we learned how to use the SCP utility to transfer files to and from a remote host. If you need to perform massive transfers using SCP, ensure to use a persistent session such as tmux.
Thank you for reading & Shells Everywhere!