We are living within the fashionable age of generation the place there are a couple of essential variables to stay monitor of. But arguably, the most important variable lately is “data”. With some maturing and rising applied sciences, the whole lot is being targeted across the amount and high quality of knowledge. Thus, collecting and protective knowledge has turn into paramount.
These days, it’s somewhat commonplace to peer other folks wearing their knowledge round always. Different units and applied sciences are used for this function, together with a definite instrument known as USB (Universal Serial Bus).
A USB is an digital conversation protocol (ECP) maximum recurrently used for laptop equipment and different small-end digital units, both for knowledge switch or energy switch. Although USBs are being phased out slowly because of applied sciences similar to “Cloud Computing”, there’s a sense of privateness and safety with the use of USBs that you simply don’t get with different strategies.
Accessing USBs is easy. It is a plug-and-use instrument, so the stick handiest must be hooked up in your laptop by the use of a USB port. Usually, USBs mount themselves routinely in your device without reference to the working device, however there are circumstances the place there’s a downside, and the USB refuses to attach.
For such instances, if you’re the use of a Linux distro, it’s best to make use of the Terminal and execute your method to mount the USB to your laptop. This article can be guiding you on how precisely you’ll be able to do so activity.
Although it’s time-consuming, as soon as you understand how to mount a USB in Linux, you’ll really feel lightened, and it is going to be more straightforward so that you can carry out it the following time when wanted. So practice those directions to get a correct cling of it.
1) Plugin Your USB Drive into Your PC
First, you want to plug to your USB pressure in your Linux-based non-public laptop (PC), wherein you need to get entry to the USB pressure.
2) Detecting the USB Drive on Your PC
The 2d step is an important and simple step to perform. After plugging to your USB in your laptop, the device will upload a brand new block instrument into the /dev/ listing. To test that, use the next command. But first, open your Command Terminal after which sort the next command:
The ensuing display screen will have to be noticed with an output like this:
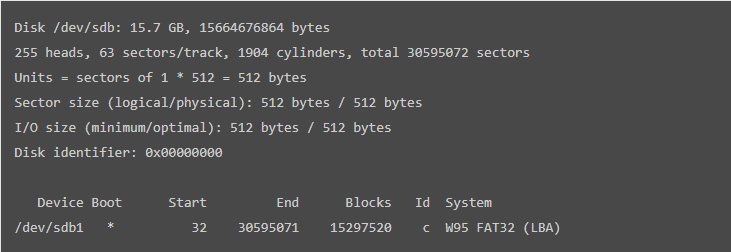
The end result above displays that instrument boot, blocks, identity, and device layout are displayed. After this step, you want to create a mount level.
3) Create a Mount Point
For making a mount level, simply sort the next command:
In the command stated above, “sbd1” refers back to the identify of your USB Device.
4) Creating a Directory within the USB Drive
We transfer directly to your next step. In this step, you will have to create a listing within the fastened instrument. For that, use the next command:
$ cd /mnt
/mnt$ mkdir John
The above instructions will create a listing named “John” within the USB Drive. You can create the listing of your required identify by means of changing it with John. For instance.
$ cd /mnt
/mnt$ mkdir Google
This command will create a listing within the USB Drive with the identify “Google”. After finishing this step, you’ve got now effectively fastened the USB pressure to your Linux device.
5) Delete a Directory in USB Drive
After studying about making a Directory to your USB, it’s time to be informed about how you’ll be able to delete a listing to your USB Drive. To delete a listing, write the next command.
The above-mentioned command will delete the pressure named as “John”. But if you wish to delete a listing along with your desired identify, simply exchange it with “John”. For instance.
The above code deletes the listing named “Google”. Similarly, you’ll be able to write any of your required names to delete a listing to your USB Drive on a Linux-operated laptop.
6) Formatting the Mounted USB in Linux
In order to layout a USB Flash Drive, you want to unmount the pressure first. Use the next command to unmount the USB.
In the aforementioned command, “sbd1” refers back to the identify of your USB Device. Next, you’ve got to make a choice both of the next codes as in keeping with your USB Drive record techniques:
For VFAT (FAT32) File System
To layout VFAT (FAT32) record device, use:
$ sudo mkfs.vfat /dev/sdb1
In the command stated above, “sbd1” refers back to the identify of your USB Device.
For NTFS File System
To layout NTFS record device USB Drive, use:
$ sudo mkfs.ntfs /dev/sdb1
For EXT4 File System
For formatting EXT4 record device USB Drive, use:
$ sudo mkfs.ext4 /dev/sdb1
Conclusion
This information lined how one can mount a USB pressure to your Linux device. It additionally described the instructions you’ll be able to use to delete directories or layout your USB instrument. We hope that we will let you out and that you’ll be able to use your USB along with your Linux with none issues.