Linux supplies you probably the most often used command this is “useradd” or “adduser.” It lets you upload or create the person to the Linux gadget and a few houses that can vary from some other person. These customers can get right of entry to some recordsdata or directories, and a few customers won’t rely on what get right of entry to they have got. Whenever a person is added or created, get right of entry to is given to that person as according to the requirement.
The “useradd ” command might range for quite a lot of Linux distributions, so it is suggested that you just learn the documentation correctly earlier than you create a brand new person account in Linux. We spotlight the strategies on how you’ll be able to upload or create a brand new person inside the Linux gadget.
Whenever you run the “adduser” command at the terminal, it’s going to carry out the next duties.
- You are allowed to make adjustments to the stated Linux recordsdata – /and so on/passwd, /and so on/shadow, /and so on/crew, and /and so on/gshadow on every occasion you create a brand new person account.
- You are allowed to create and populate the person’s house listing on every occasion you create the brand new person.
- You are allowed to set permissions and ownerships for the brand new customers to the house listing.
Syntax of the “adduser” command as follows
useradd [options] username
Adding New User in Linux
For including or growing a brand new person, use the “adduser” or the “useradd” command in conjunction with the username. The username generally is a login title for login into the Linux gadget. You can upload just one person and should be other from some other person present at the gadget.
Suppose you wish to have so as to add the person named “Sammy,” then run the below-mentioned command at the terminal.
[root@source ~]# useradd sam
If you utilize the “useradd” command, the person is created within the locked state, and for unlocking that person account, set a password for that account the usage of the “passwd” command as proven beneath.

After growing the brand new person, you’re going to see a brand new access robotically added to the “/etc/passwd” record, and it’s going to retailer the person’s knowledge in a singular layout, as proven beneath.
sammy:x:504:504:sammy:/house/sammy:/bin/bash
The above knowledge will specify the next fields separated through a colon in respective order.
- Username: specifies the person login title for logging into the gadget and must be as much as 32 characters lengthy.
- Password: this person credential is saved within the /and so on/shadow record as an encrypted layout.
- User ID (UID): each person has a User ID referred to as a User Identification Number.
- Group ID (GID): stands for Group Identification Number and is saved in /and so on/crew record in conjunction with the opposite main points of the person.
- User Info (non-compulsory) will retailer additional knowledge, similar to complete person title and others.
- Home Directory: it is helping in defining absolutely the location of the person’s house listing.
- Shell specifies absolutely the location of a person’s shell, i.e.,/bin/bash.
Creating a User With a Different Home Directory
Whenever you run the “adduser” command, it’s going to create the person’s house listing underneath the /house listing in conjunction with the username. If you wish to have to switch the site of the house listing for the brand new person, use the “-d” choice in conjunction with the “adduser” command.
The beneath command will create the person “nick” with the house listing as “/data/nick.”
[root@source ~]# useradd -d /knowledge/nick nick
If we test the content material of the /and so on/passwd record, you’re going to to find the next details about the person nick.
nick:x:505:505::/knowledge/nick:/bin/bash
Creating a User With a Specific User ID
A Unique Identification Number (UID) is borne through each person. While growing the brand new person in Linux, the gadget will assign the numbers 500, 501, 502, and so on., through default. However use the “-u” choice in conjunction with the “adduser” command if you wish to assign a particular person ID to the newly created person,
Here, we upload a person “diva” and assign a brand new UID as “1122,” as proven beneath.
[root@source ~]# useradd -u 1122 diva
To test the added information about the person, test the content material of the “/etc/passwd” record, and you’re going to see the next person main points.
diva:x:1122:1122::/house/diva:/bin/bash
Creating a User With a Specific Group ID
Every person at the Linux gadget has a Group Identification System. You can use the “-g” choice in conjunction with the “useradd” command for making a person with a particular crew ID. within the beneath instance; we’re including a person named “geet” with a particular GID and UID the usage of the “-u” and “-g” choices.
[root@source ~]# useradd -u 1000 -g 500 geet
For checking the element of the newly added person to the gadget, test the content material of the /and so on/passwd record as proven beneath.
geet:x:1000:500::/house/geet:/bin/bash
Adding a User to Multiple Groups
If you want to upload a brand new person to more than one teams, point out the “-G” choice in conjunction with the “adduser” command. You can separate the quite a lot of teams the usage of commas with none area, as proven beneath.
[root@source ~]# useradd -G admins,webadmin, builders downey
You can test the more than one teams assigned to the person the usage of the “id” command as proven beneath.
uid=1001(downey) gid=1001(downey)
teams=1001(downey),500(admins),501(webadmin),502(builders)
context=root:system_r:unconfined_t:SystemLow-SystemPrime
Adding a User Without the Home Directory
Suppose you don’t need to assign a house listing to the newly added person because of safety customers than the “-M” choice in conjunction with the “adduser” command. Here we’re growing a brand new person, “Nancy” with out a house listing for it.
[root@source ~]# useradd -M nancy
If you wish to have to test the person is created with out the house listing, use the below-mentioned “ls” command as proven beneath.
Is: can not get right of entry to/house/nancy: No such record or listing
Creating a User with an Account Expiry Date
Whenever we upload the person the usage of the “adduser” command, the account won’t ever expire because the expiry date is 0. But you’ll be able to upload the expiry date for the person the usage of the “-e” choice and the “useradd” command, as proven beneath.
It will create a brief account for the required time given within the “YYYY-MM-DD” layout.
[root@source ~]# useradd -e 2014-03-27 nancy
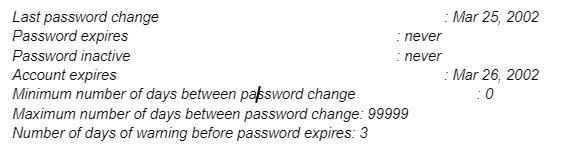
For checking the account age and password of the person, you’ll be able to use the “chage” command for the “Nancy” person.
[root@source ~]# chage -l nancy
Creating a User with Password Expiry Date
If you wish to have to outline the choice of days after the expiration of a password, you’ll be able to use the “-f” choice in conjunction with the “useradd” command. The “0” worth will stay inactive for the person because the password expires. By default, the password expiry worth is “-1,” this means that it’s going to now not expire. But if you wish to create a brief person with some password expiration date, use the “-f” choice in conjunction with the “useradd” command, as proven beneath.
[root@source ~]# useradd -e 2014-04-27 -f 45 mishi
Adding a User with Custom Comments
If you wish to have so as to add some feedback to the person’s main points within the /and so on/passwd record, use the “-c” choice and the “useradd” command. Add the remark as a unmarried line with no need any area, as proven beneath.
Here, we upload a person “mathew” in conjunction with the entire title “mathew stellar”.
[root@source ~]# useradd -c “Mathew Stellar” mathew
You can see the added main points within the /and so on/passwd record as proven beneath.
mathew:x:1006:1008:Mathew Stellarr:/house/mathew:/bin/sh
Changing User Login Shell
Whenever we upload a brand new person, they don’t have to do anything else with the login shell. However, continuously there’s a wish to assign a distinct login shell to the customers. Linux lets in assigning other login shells to every person the usage of the “-s” choice in conjunction with the “useradd” command.
Here we upload the person “dash” with out the login shell (/sbin/nologin) shell.
[root@source ~]# useradd -s /sbin/nologin sprint
You can test the main points underneath the /and so on/passwd record.
sprint:x:1002:1002::/house/sprint:/sbin/nologin
Adding a User With Specific Home Directory, Default Shell, and Customized Comment
We are the usage of the next command for including a brand new person “raj” with the house listing as “/var/www/xyz,” with default shell as “/bin/bash,” and including some additional knowledge in regards to the person.
[root@source ~]# useradd -m -d /var/www/raj -s /bin/bash -c “Cinema Owner” -U raj
In the above instance, the -m and -d choices are used for growing a brand new person with the required house listing, and the -s choice will set the default shell for that person, and the -c choice will upload the desired remark for the person. Check the added knowledge within the /and so on/passwd record.
Conclusion
The Linux gadget has a distinct approach of including a brand new person and comparable main points saved in recordsdata provide at the Linux gadget. You can use both the “useradd” or “adduser” command as your Linux distribution so as to add a brand new person to the gadget. Also, you’re going to get to make use of quite a lot of choices in conjunction with the command for including further main points for converting the default settings for the added person. You can undergo this text and perceive the detailed use of the “useradd” command and its quite a lot of choices.