LVM snapshots are the point-in-time copies of the logical volumes. The snapshots volumes take further space whenever a change occurs in the original logical volume. For example, if the changes made to the original logical volume are 1GB in size, then the logical volume snapshot will also take a space of 1GB. Therefore, it is good for space efficiency to have small changes to the original logical volume for space efficiency.
Listing Logical Volumes and Snapshots
Before mounting the snapshot volumes on your system, list all the available snapshot volumes and logical volumes by running the lvscan command.

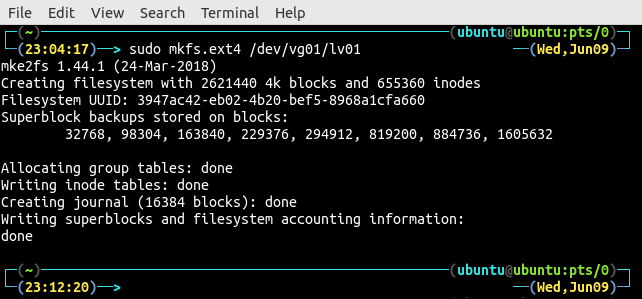
The above command listed all the available logical volumes and snapshot volumes, and there is no snapshot volume in the list. Before creating a snapshot volume, creating a filesystem on logical volume as the logical volumes or snapshot volumes of the logical volume can not be mounted without a file system. Create a file system on logical volume lv01 by using the mkfs (make file system) command.
Now an ext4 file system has been created on logical volume lv01.
After creating a filesystem on a logical volume, create a snapshot using the lvcreate command and the –snapshot option to specify a snapshot. The same command can also be used to create the logical volume.

The logical volume lv01, we are creating a snapshot of, is created on top of the volume group vg01; that is why the source logical volume is taken as /dev/vg01/lv01.
Again display all the available logical volumes and snapshot volumes using the lvscan command to check whether the snapshot volume of the logical volume lv01 is created or not.
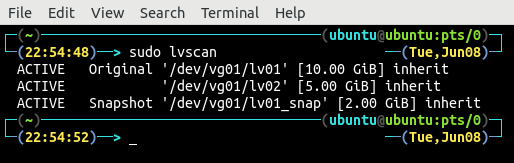
The newly created snapshot volume is also listed along with the logical volumes and is marked as Snapshot. Display the detailed information about the snapshot volume by using the lvdisplay command.
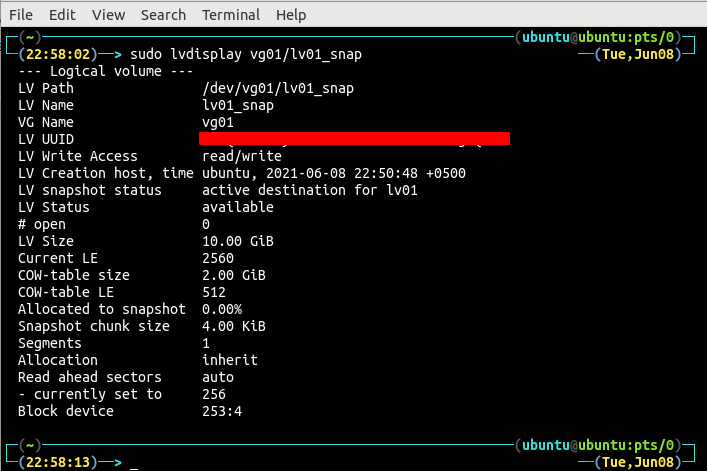
The detailed information includes the name of the snapshot volume we specified while creating the snapshot. The UUID of the snapshot volume is a universally unique id that distinguishes the snapshot. The status of the snapshot is active, and the origin is logical volume lv01. The LV Size field shows the original size of the logical volume.
Mounting Snapshot
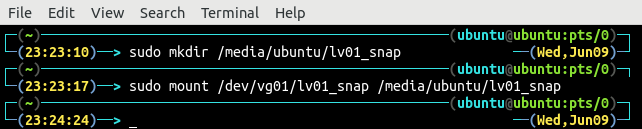
After creating a snapshot of a logical volume, now it is time to mount the snapshot volume on the system. Use the mount command to mount the snapshot volume on the system. First, create a directory on which the snapshot volume is going to be mounted.
Now mount the snapshot volume on the newly-created directory.
Now the snapshot volume is mounted and can be used to store data. For example, list all the available file systems using the df command, and the mounted snapshot volume will be there.
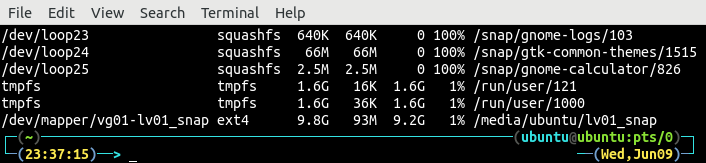
The command shows the filesystem of the snapshot volume, the mount location, the size of data stored in the snapshot, and the free space available on the snapshot volume.
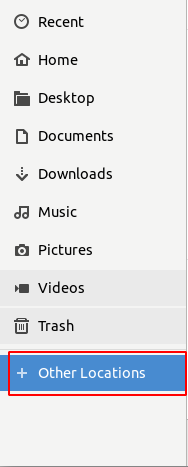
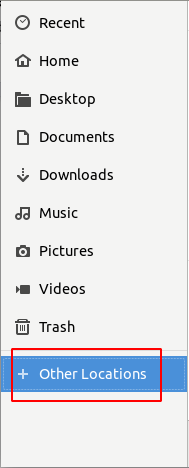
The snapshot volume and the original logical volumes can also be mounted using GUI. First, launch the file explorer and select the ‘Other Locations’ from the left side menu.
It will show all the mounted and unmounted volumes there.
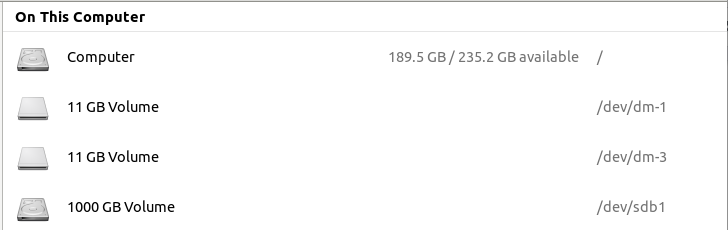
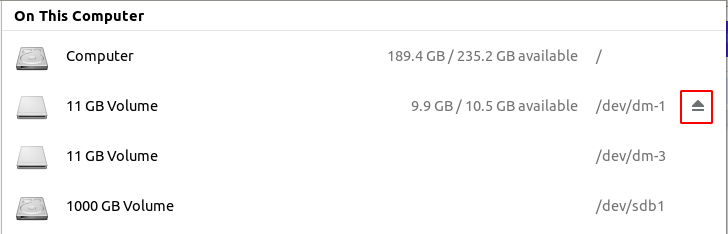
The two volumes with identical size are the logical volume lv01 and the snapshot of the logical volume lv01_snap. The logical lv02 is not showing up there as the file system for that volume has not been created and can not be mounted. Right-click on the snapshot volume and select the ‘mount’ option from the menu, and the snapshot volume will be mounted. It actually shows a mount sign on the right side of the snapshot volume.
The snapshot volumes mounted using the graphical user interface are mounted at ‘/media/ubuntu/’.
Now after mounting the snapshot volume using a graphical user interface, list all the mounted devices on the system by using the lsblk command to check whether the snapshot volume is mounted or not.
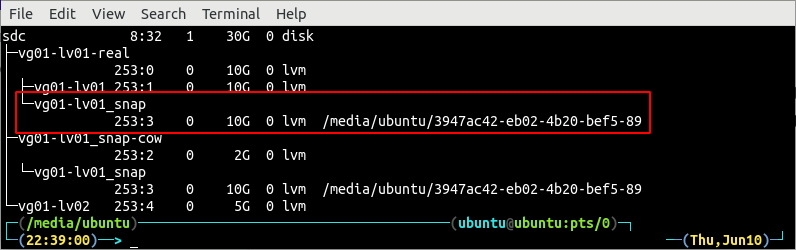
The above figure shows that the snapshot volumes mounted using a graphical user interface are mounted at ‘/media/ubuntu/’.
Unmounting Snapshot Volumes
Before unmounting any snapshot volume, list all the mounted volumes to check whether the snapshot volume is mounted or not.
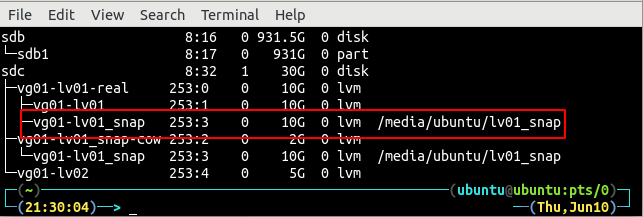
The snapshot volume is mounted at ‘/media/ubuntu/lv01_snap’. Use the umount command and specify the location of the snapshot volume to unmount the snapshot volume.

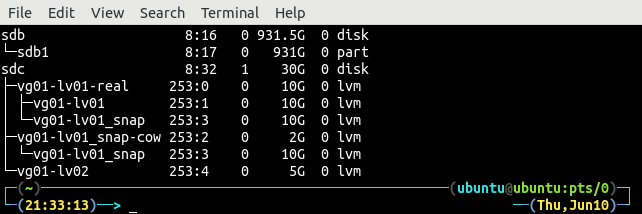
After unmounting the snapshot volume, again list all the mounted logical volumes to check whether the snapshot volume is unmounted or not.
So the snapshot volume has been unmounted. The snapshot volumes can also be unmounted by using a graphical user interface. Launch the file explorer and select the ‘Other Locations’ from the left side menu.
It will display all the mounted and unmounted logical volumes and snapshot volume, which has a file system on top of them.

The mounted volumes can be differentiated from the unmounted ones as they have a small up arrow icon highlighted in the above figure. To unmount the mounted snapshot volume using a graphical user interface, right-click on the mounted volume and select the ‘Unmount’ option from the list.
After unmounting a snapshot volume, list all the logical volumes and snapshot volumes to check whether the snapshot volume has been unmounted or not.

Conclusion
Before mounting a snapshot volume, it is necessary to create a file system on top of the logical volume. In this tutorial, the complete procedure of mounting and unmounting snapshot volumes has been described by using a command-line interface and graphical user interface.