Linux is a various running machine maximum recognized for its terminal instructions. These instructions are of 100 sorts and usages. One of those Linux instructions is the “Usermod” command. The usermod command can be utilized for appearing a large number of issues the usage of flags. This command is in particular designed for Linux customers to replace and alter the rest referring to different customers of their current machine. Within this information these days, you’re going to see the other makes use of of the “Usermod” command in Ubuntu 20.04. Let’s have a brand new get started with one of the usermod command examples to peer the ones flags running. Let’s get began.
Let’s get started with the release of a Ubuntu 20.04 console software. The shortcut key “Ctrl+Alt+T” shall be used to release it in our machine briefly. To use the usermod command in Linux, we should use it within the terminal with sudo rights. For using sudo rights, you need to use the key phrase “su” within the shell, as proven beneath. It would require your root account password and press Enter to take action. You will see that we will paintings in a sudo terminal surroundings.

01: Add Extra Detail to User Account
Firstly, we can use the usermod command so as to add some element to a couple person accounts. For that, we can be the usage of the “-c” flag with that element and the username of an account, i.e. “Linux”. To test the updates, we need to use the grep command with the “-E” flag and the title of an account “Linux” whilst bringing up the trail to the “/etc/passwd” document. It will display us the up to date information about the person “Linux” as proven beneath.

02: Update Primary Group
We are in a position to updating the principle workforce of any person in Linux the usage of the usermod command. Firstly, we want to test the account’s information about its workforce the usage of the “id” command displayed beneath. The “Linux” person works in the principle “Linux” workforce.
![]()
The “-g” flag inside the usermod command can can help you exchange the principle workforce of a person “Linux”. We will exchange the “Linux” workforce with the “admin” workforce. Using the “id” command, we will be able to see the exchange in the principle workforce of an account “Linux”.

The capital “-G” flag inside the usermod can be utilized to append the brand new teams to the particular account with out converting the principle workforce and deleting the former ones.

03: Update Account’s Username
The “-l” flag can be utilized within the usermod command to switch the username or login title of any explicit person up to now. So, we’ve got modified the title of the account “Linux” to “Linux admin”. The “id” command has been used to get the guidelines in regards to the account “Linux”. It outputs that the “Linux” title has no longer been discovered up to now.

So, we’ve got modified the “linuxAdmin” to “linux” username as soon as once more the usage of the “usermod” command. After the usage of the “id” command, we’ve got discovered the main points about “Linux” once more.

04: Lock Account
To lock the precise account, you wish to have to make use of the “-L” flag within the usermod command, as you’ll see underneath. The use of the “grep” command for the “Linux” person to peer the “/etc/shadow” document if the account is locked or no longer. The output displays the “!” signal after the title of an account which illustrates that this account is locked.

05: Unlock Account
You want to use the “-U” flag inside of the similar usermod command as demonstrated beneath to liberate the already locked account. Now, the output of the “grep” command displays no “!” signal.

06: Move Home Folder
You can transfer the contents of a house listing of a specific account to every other folder of your selection. You have to test for the present house listing of an account “Linux” the usage of the grep command with the “/etc/passwd” document main points. It displays that the house folder is these days the “Linux” folder.
![]()
To exchange it, you need to employ the “-d” flag for listing, “-m” flag for “move” at the side of the trail to a brand new listing, and “/var/linux/”. Now the Linux folder has ch illustrated th been stored to the “var” listing as consistent with the grep command within the symbol.

07: Make Passwords Visible
Using the usermod command within the shell, we will be able to merely un-encrypt the precise person password. For this, we want to use the “-p” flag inside the usermod command at the side of the password of the “Linux” account. The grep command will display you the password in the main points.

08: Update Shell
We can use the “-s” flag within the usermod command to switch the shell of a specific person. Firstly, we need to test for the present person shell the usage of grep because it outputs “/bin/sh/”.

Using the usermod command with “-s’ flag along with the new shell “bash”, we will be able to exchange the account “Linux” shell.

09: Update ID’s
We too can use the usermod command to switch the person and its workforce ID’s. Firstly, you need to use the easy “id” command to peer the present “IDs”. After that, we can be the usage of the “-u” flag inside the usermod command to switch the present person “ID” for “Linux” to 1001. The “ID” for the usage of Linux has been up to date after checking the account knowledge.

To exchange the gang “ID”, you need to point out the brand new workforce ID with the “-g” flag at the side of the username within the usermod command. You too can employ the “-u” and “-g” flags each in one command to switch each person “ID” and its workforce “ID” on the similar time. The command is proven beneath. After rechecking, you’ll see the IDs are up to date within the report.

10: Update Account’s Home Folder
Firstly, we want to test the present house folder of the particular person, i.e. Linux, after which replace the listing. So, the grep command with the “-E” flag and “/etc/passwd” document location shall be used to take action, as demonstrated beneath.

To replace the folder, we want to use the “-d” flag inside the usermod command at the side of the brand new trail “/home/Linux/” to the present account, i.e. Linux. After the usage of the similar grep command with the “-E” flag and “/etc/passwd” document location, we will see those adjustments.

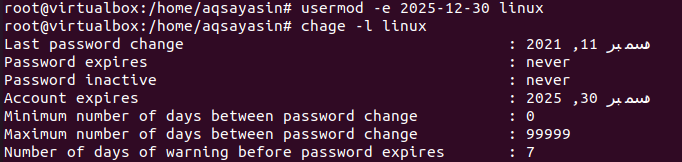
11: Update Expiry Date
The usermod command we could us exchange the present expiry date of any person. Firstly the Linux sudo terminal comes up with the “chage” command to checklist all of the account information about passwords. So, we can see these kind of main points the usage of a “Linux” account as displayed.

Let’s use the usermod command with the “-e” flag to switch the expiry date of person “Linux” as displayed. After that, the similar “chage” command shall be used to checklist the password main points of person “Linux”. In go back, the output displays us the brand new expiry date intimately.
Conclusion:
We have completed with the Linux usermod command. We have coated all of the conceivable most simple easy methods to use the “usermod” command within the sudo terminal of the Ubuntu 20.04 machine. We have obviously described every manner and usermod command utilization intimately to our customers on this article.