Before diving into information about the Logic Volume Manager (LVM) it’s crucial to grasp what LVM is. LVM supplies other how to building up the scale of the logical quantity. Extending the logical quantity can building up the scale however a brand new disk must be added in case the quantity workforce additionally runs out of area. In this instructional, we will be able to use the LVM command-line interface so as to add a brand new disk to an current logical quantity by way of following the stairs under:
- New bodily quantity advent
- The quantity workforce extension
- The logical quantity extension
- Mounted filesystem extension
Pre-requisites
To practice this instructional, you will have to have a bodily quantity constituted of a disk. The bodily quantity must have a quantity workforce, vg01, on it. A logical quantity lv01, created in this quantity workforce vg01.
List the entire to be had bodily volumes by way of operating pvs, pvscan or pvdisplay instructions within the terminal.
OR
OR
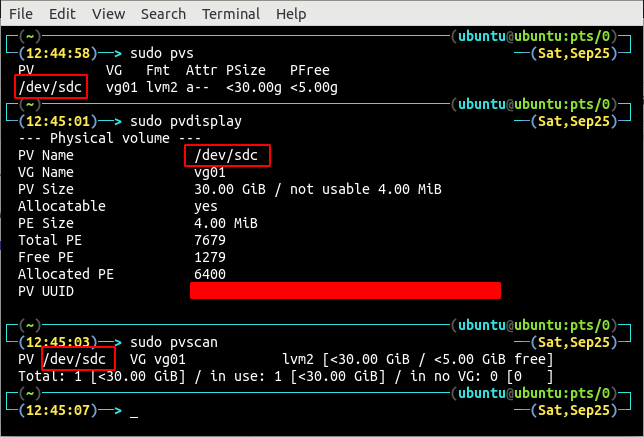
Notice the one one bodily quantity /dev/sdc within the machine. Now, record the entire quantity teams created on /dev/sdc bodily quantity the use of any of the vgs, vgscan or vgdisplay instructions.
OR
OR
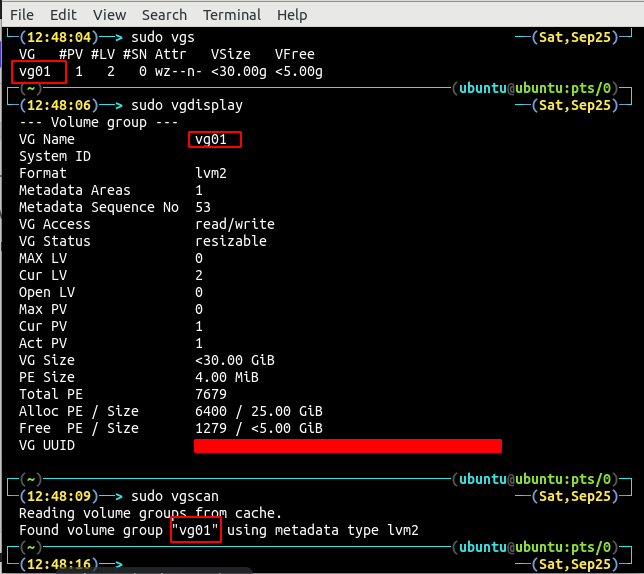
The command presentations the presence of just one quantity workforce vg01 at the bodily quantity /dev/sdc, within the machine. The following instructions can be utilized to seek out the entire logical volumes over the quantity workforce.
OR
OR
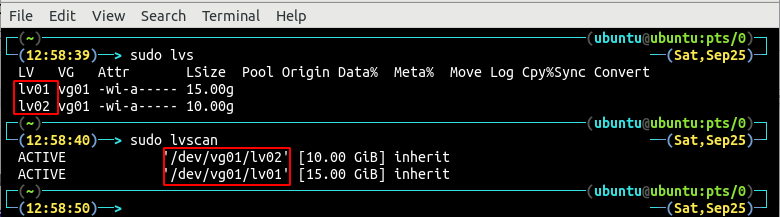
There are two logical volumes lv01 and lv02 at the quantity workforce vg01.
Create a New Physical Volume
First record the entire bodily gadgets hooked up to the machine by way of the use of the lsblk command.
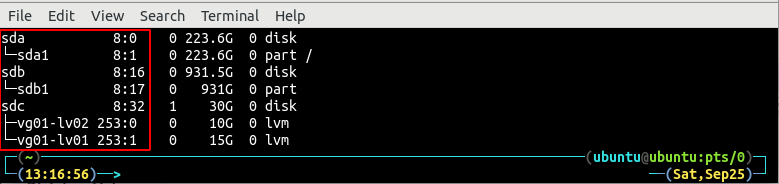
There are 3 bodily gadgets hooked up to the machine and one in all them (/dev/sdc) is the instrument which is getting used as bodily quantity. Now, connect a brand new bodily instrument and once more record the entire hooked up gadgets.
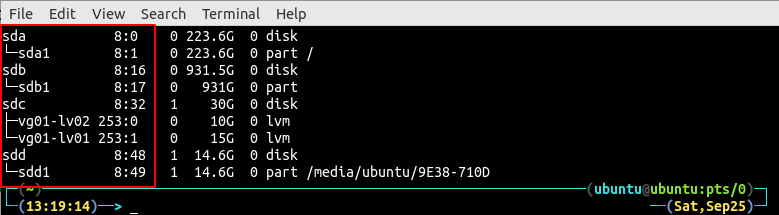
There are 4 bodily gadgets hooked up to the machine. The newly hooked up instrument (/dev/sdd1) is recently fixed at the machine. Unmount the /dev/sdd1 instrument as follows:
Now, layout the instrument with the dd command. This command will take a while to layout the instrument relying upon the scale of the instrument hooked up.
NOTE: Formatting the instrument will erase the entire knowledge within the instrument. Create a backup of the information prior to formatting it.

Create a bodily quantity from the newly hooked up bodily instrument the use of the pvcreate command.

It will create a bodily quantity from the bodily instrument hooked up. Display the entire bodily volumes by way of the use of any of the pvs, pvscan or pvdisplay instructions.
OR
OR
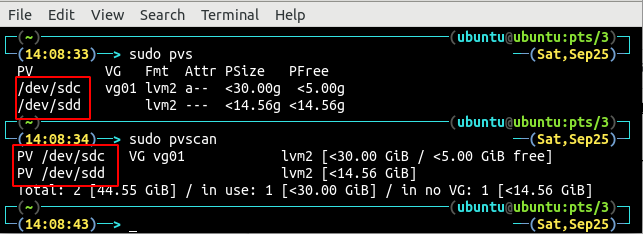
The output presentations two bodily volumes /dev/sdc and /dev/sdd created at the machine.
Volume Group Extension
Extend the quantity workforce vg01 the use of the vgextend command to hide each the bodily volumes.

The above command output presentations that the quantity workforce vg01 is spanning each the bodily volumes /dev/sdc and /dev/sdd and it has more room. List the main points of the quantity workforce vg01 the use of the vgdisplay command.
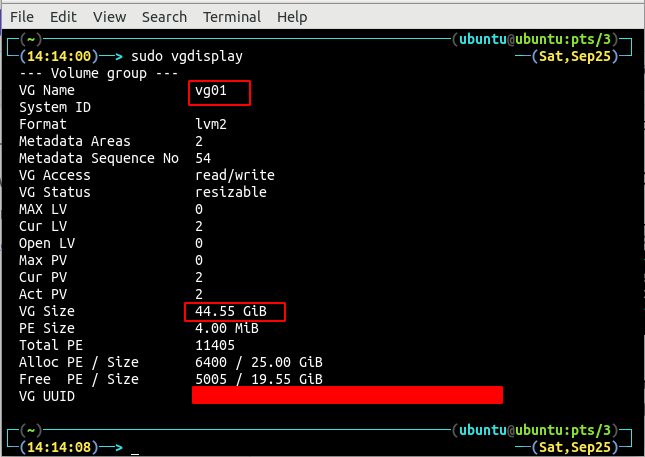
The general dimension of the quantity workforce vg01 is now 44.5 GB that in the past was once simplest 30 GB.
Extend the Logical Volume
Now, we will both create some other logical quantity from this area or we will prolong the present logical quantity to make use of this area. For this information, we will be able to prolong the present logical quantity so as to add more room.
Display the to be had logical volumes with any of the next instructions:
OR
OR
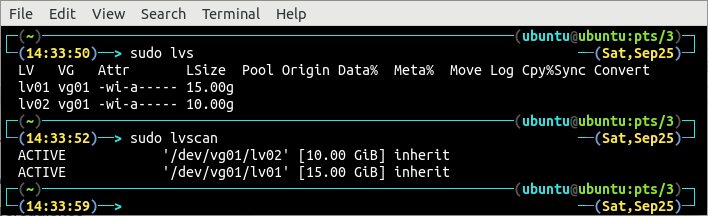
Currently there are simplest two logical volumes lv01 and lv02 with 15 GB and 10 GB area respectively. For this instructional, we will be able to prolong the logical quantity lv01 the use of the lvextend command from 15 GB to twenty-five GB.
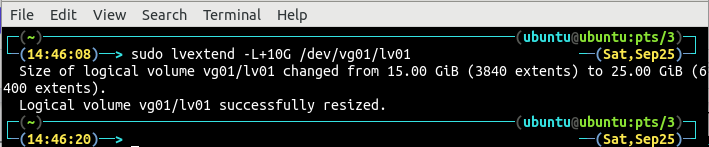
After extending the logical quantity dimension, now record the logical quantity main points the use of the lvdisplay command.
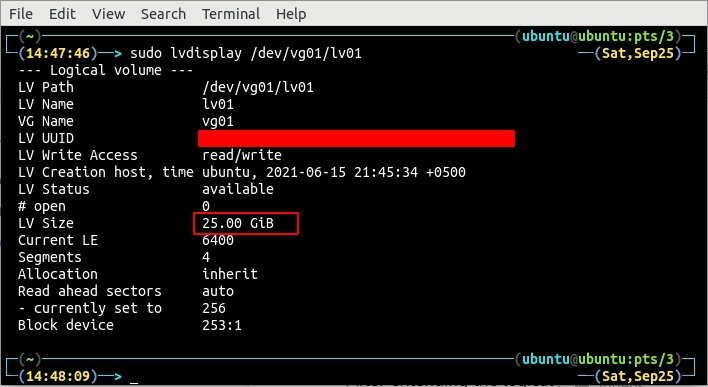
So, the scale of the logical quantity lv01 is now 25 GB and has been prolonged effectively.
Extend the Filesystem Mounted at the System
Mount the logical quantity the use of the mount command:

After mounting the logical quantity, now show the filesystem with the df command to test the filesystem dimension.

The filesystem dimension isn’t prolonged so it must be prolonged the use of the resize2fs command.
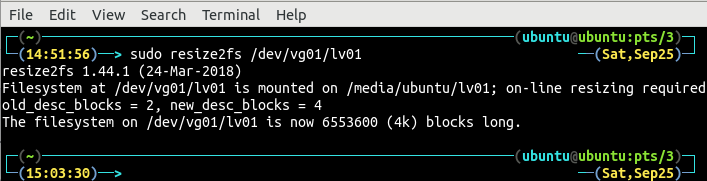
After extending the filesystem, run the df command to ensure dimension extension of the filesystem.

Now, the filesystem dimension is 25 GB and it’s been prolonged effectively.
Conclusion
Logical quantity dimension control at the operating servers is without doubt one of the many activity duties of the machine administrator. Such that they have got to handle its area scarcity because of over the top knowledge on a daily foundation.
Logical quantity extension calls for some area within the quantity workforce on which logical quantity exists. In case there is not any loose area to be had at the quantity workforce, a brand new bodily instrument is connected to create loose area. The article is a information that gives them with a step-by-step information on learn how to upload a brand new disk to increase the logical quantity and the report machine fixed at the machine.