ZFS volumes are block garage gadgets that paintings like another garage software (HDD/SSD). You’ll create partition tables, create new walls, structure those walls, create filesystems, and mount them to your pc.
You’ll additionally percentage ZFS volumes by means of the iSCSI protocol and get entry to them from faraway computer systems.
On this article, I’m going to turn you how you can percentage ZFS volumes by means of iSCSI and get entry to them from faraway computer systems. I will be able to be the use of the Ubuntu 20.04 LTS running device for the demonstration. Then again, the stairs proven on this article will have to additionally paintings on different Linux distributions with some changes.
Let’s get began.
Desk of Contents:
- Community Diagram
- Putting in tgt at the iSCSI Server
- Putting in open-iscsi at the iSCSI Consumer
- Making a ZFS Pool
- Developing ZFS Volumes
- Developing iSCSI Objectives
- Including ZFS Volumes to the iSCSI Objectives
- Configuring iSCSI Authentication (Non-compulsory)
- Producing iSCSI Server Configuration
- Gaining access to Shared ZFS Volumes by means of iSCSI
- Mechanically Mounting Shared ZFS Volumes by means of iSCSI
- Conclusion
- References
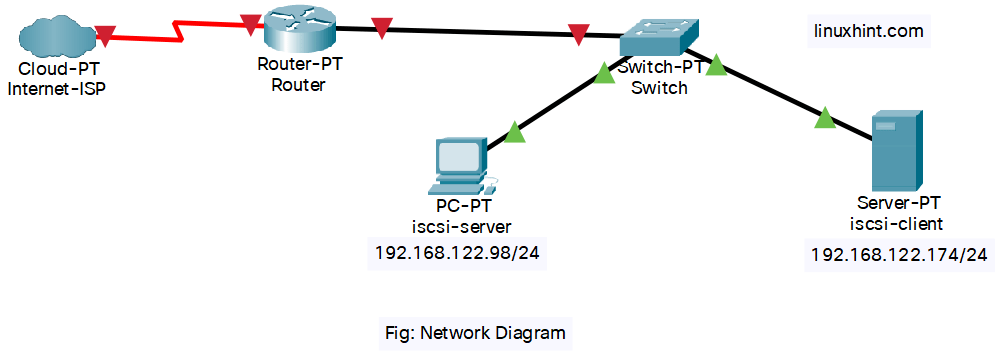
Community Diagram:
On this article, I will be able to arrange two Ubuntu 20.04 LTS computer systems: iscsi-server and iscsi-client. I will be able to set up ZFS and the iSCSI server device at the iscsi-server pc and configure it to percentage ZFS volumes by means of iSCSI.
I will be able to set up the iSCSI Jstomer device at the iscsi-client pc and configure it to get entry to the ZFS volumes exported from the iscsi-server pc by means of iSCSI.
The entire setup is visualized within the determine beneath:
Putting in tgt at the iSCSI Server:
On this segment, I’m going to turn you how you can set up the iSCSI server package deal tgt at the iscsi-server pc.
First, replace the APT package deal repository cache as follows:
Then, set up the tgt package deal at the iscsi-server pc with the next command:
$ sudo apt set up tgt -y

When you don’t have ZFS put in at the iscsi-server pc already, it’s possible you’ll set up it with the next command:
$ sudo apt set up zfsutils-linux -y

Putting in open-iscsi at the iSCSI Consumer:
On this segment, I’m going to turn you how you can set up the iSCSI Jstomer package deal open-iscsi at the iscsi-client pc.
First, replace the APT package deal repository cache with the next command:

Then, set up the open-iscsi package deal at the iscsi-client pc with the next command:
$ sudo apt set up open-iscsi -y

Making a ZFS Pool:
For the demonstration, I will be able to create a ZFS pool, pool1, at the iscsi-server pc the use of the vdb and vdc garage gadgets:
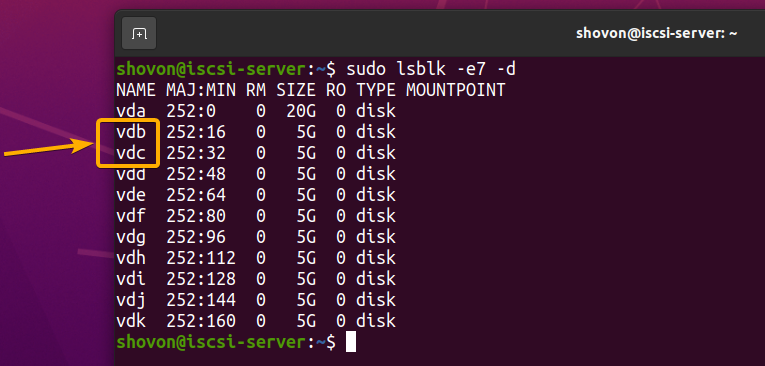
Create a ZFS pool, pool1, the use of the vdb and vdc garage gadgets in reflect configuration as follows:
$ sudo zpool create -f pool1 reflect vdb vdc

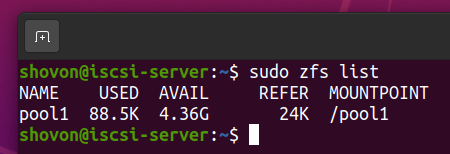
A brand new ZFS pool, pool1, will have to be created at the iscsi-server pc.
Developing ZFS Volumes:
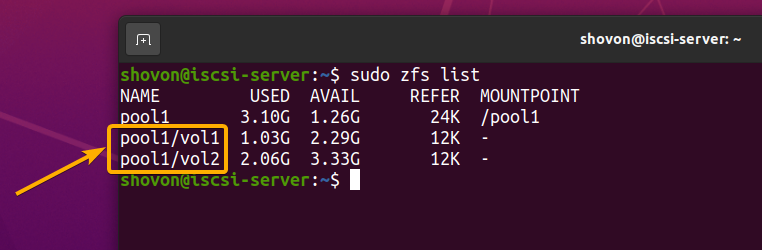
On this segment, I’m going to turn you how you can create ZFS volumes vol1 and vol2 at the ZFS pool, pool1, with the intention to export them by means of iSCSI.
To create a ZFS quantity vol1 of measurement 1 GB at the ZFS pool, pool1, run the next command:
$ sudo zfs create -V 1G pool1/vol1

To create a ZFS quantity vol2 of measurement 2 GB at the ZFS pool, pool1, run the next command:
$ sudo zfs create -V 2G pool1/vol2

ZFS volumes vol1 and vol2 will have to be created within the ZFS pool, pool1.
Developing iSCSI Objectives:
An iSCSI goal is sort of a named container. You’ll put a number of ZFS volumes in there. Whilst you get entry to a goal from different computer systems, all of the ZFS volumes that you’ve got positioned in that container will probably be fastened.
iSCSI goal names have a regular structure:
iqn.yyyy>–mm>.fqdn-reverse-format>:unique-identifier>
Right here:
On this segment, I’m going to turn you how you can create two iSCSI objectives: iqn.2021-08.com.linuxhint.iscsi:pool1.vol1 and iqn.2021-08.com.linuxhint.iscsi:pool1.vol2. Within the subsequent segment, I will be able to display you how you can upload ZFS volumes to those objectives.
To create an iSCSI goal iqn.2021-08.com.linuxhint.iscsi:pool1.vol1 and set an ID of one for the objective, run the next command:
$ sudo tgtadm –lld iscsi –op new –mode goal –tid 1 –targetname iqn.2021-08.com.linuxhint.iscsi:pool1.vol1

In the similar method, run the next command to create an iSCSI goal iqn.2021-08.com.linuxhint.iscsi:pool1.vol2 and set an ID of two for the objective:
$ sudo tgtadm –lld iscsi –op new –mode goal –tid 2 –targetname iqn.2021-08.com.linuxhint.iscsi:pool1.vol2

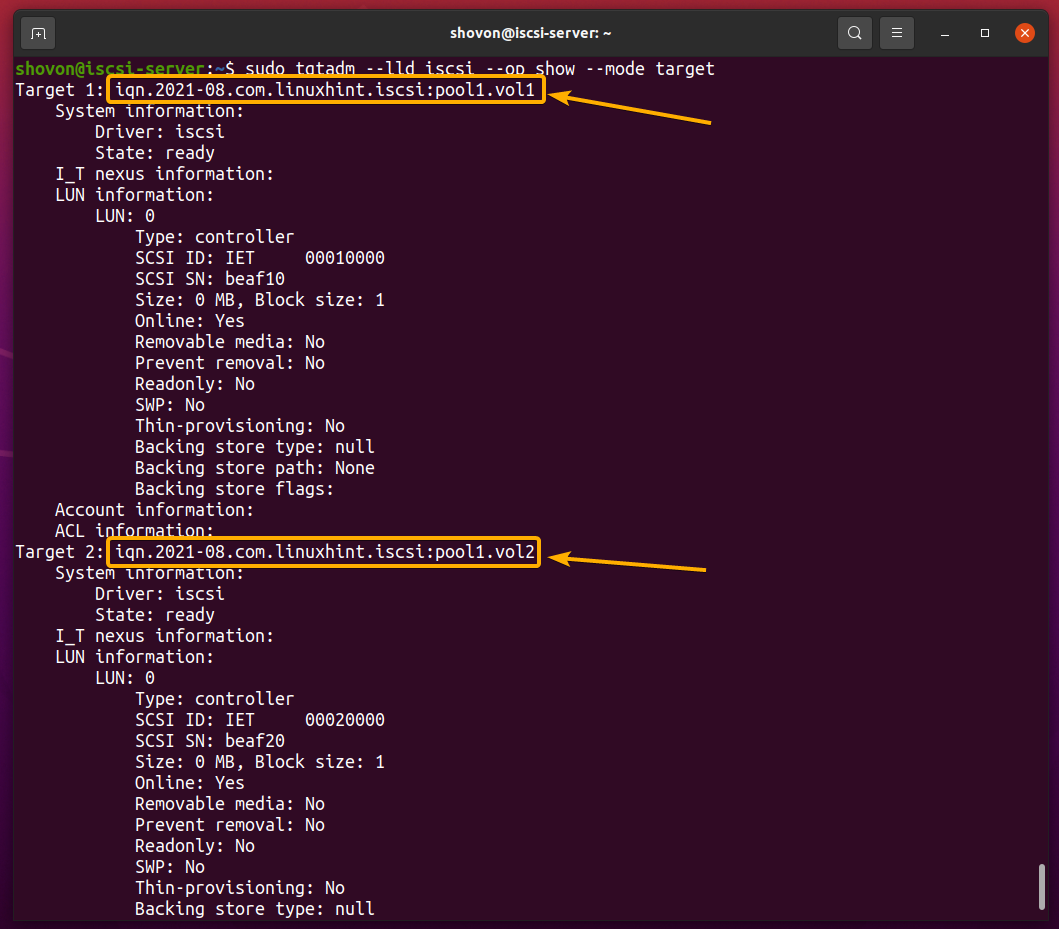
To record all of the objectives that you’ve got created, run the next command:
$ sudo tgtadm –lld iscsi –op display –mode goal

The objectives that you’ve got created will have to be indexed, as you’ll see within the screenshot beneath:
Including ZFS Volumes to the iSCSI Objectives:
The ZFS volumes that you’re going to upload to a goal are referred to as LUNs (Logical Gadgets).
As prior to now discussed, you’ll upload a number of ZFS volumes in an iSCSI goal. However, in the event you do, whilst you get entry to the objective from different computer systems, all of the ZFS volumes that you’ve got added to that concentrate on will probably be fastened. So, if you wish to permit get entry to to just one ZFS quantity in keeping with iSCSI goal, upload just one ZFS quantity to 1 iSCSI goal.
On this segment, I show how you can upload the ZFS volumes vol1 and vol2 to the objectives iqn.2021-08.com.linuxhint.iscsi:pool1.vol1 and iqn.2021-08.com.linuxhint.iscsi:pool1.vol2, respectively.
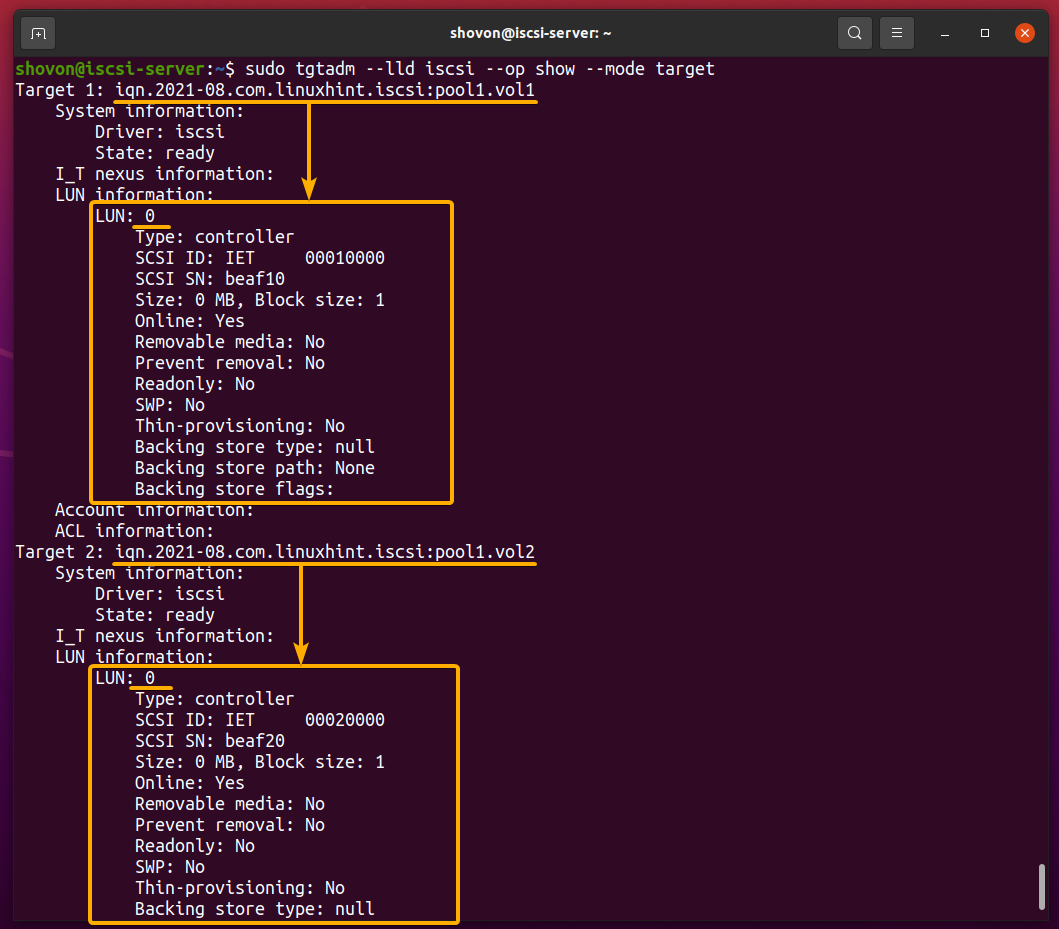
Every of the LUNs in an iSCSI goal has an ID ranging from 0. So, the primary LUN is known as LUN 0. Then, the second one LUN is known as LUN 1, whilst the 3rd LUN is known as LUN 2, and so forth.
Through default, LUN 0 of every iSCSI goal will probably be occupied via an iSCSI controller, as proven within the screenshot beneath. So, you’ll have to use LUN 1, LUN 2, and so forth so as to add your ZFS volumes to the iSCSI objectives.
$ sudo tgtadm –lld iscsi –op display –mode goal
So as to add the ZFS quantity vol1 from the ZFS pool pool1 as LUN 1 to the objective ID 1 (iqn.2021-08.com.linuxhint.iscsi:pool1.vol1), run the next command:
$ sudo tgtadm –lld iscsi –op new –mode logicalunit –tid 1 –lun 1 –backing-store /dev/pool1/vol1

So as to add the ZFS quantity vol2 from the ZFS pool, pool1, as LUN 1 to the objective ID 2 (iqn.2021-08.com.linuxhint.iscsi:pool1.vol2), run the next command:
$ sudo tgtadm –lld iscsi –op new –mode logicalunit –tid 2 –lun 1 –backing-store /dev/pool1/vol2

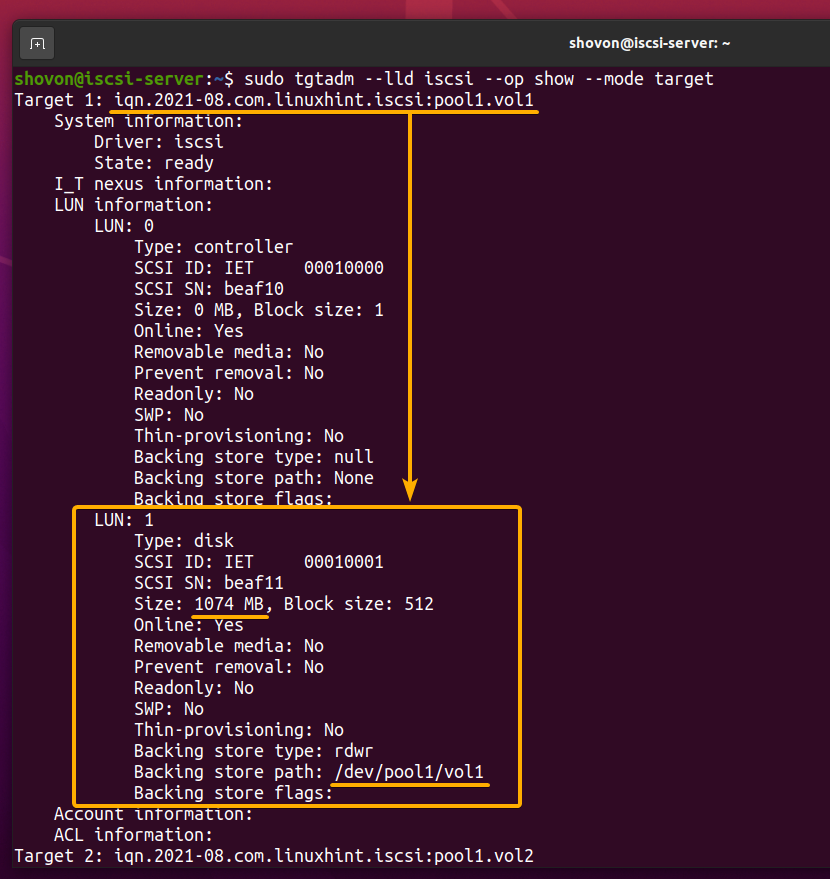
The ZFS quantity vol1 will have to be added to the iSCSI goal iqn.2021-08.com.linuxhint.iscsi:pool1.vol1 as LUN 1, as marked within the screenshot beneath:
$ sudo tgtadm –lld iscsi –op display –mode goal
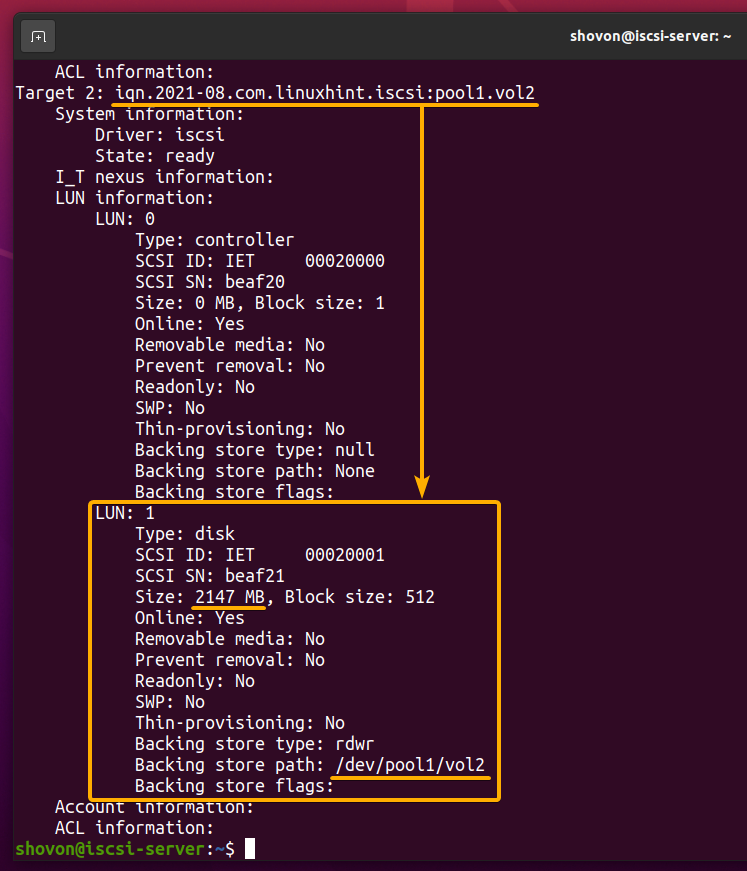
The ZFS quantity vol2 will have to be added to the iSCSI goal iqn.2021-08.com.linuxhint.iscsi:pool1.vol2 as LUN 1, as marked within the screenshot beneath:
Configuring iSCSI Authentication (Non-compulsory):
On this segment, I’m going to turn you how you can permit fundamental username and password authentication for the iSCSI objectives iqn.2021-08.com.linuxhint.iscsi:pool1.vol1 and iqn.2021-08.com.linuxhint.iscsi:pool1.vol2.
You’ll fortunately skip this segment in the event you don’t need to permit authentication on your iSCSI objectives.
First, create a brand new iSCSI consumer linuxhint1 with a dummy password 123456 (you’ll have to trade it later) with the next command:
$ sudo tgtadm –lld iscsi –op new –mode account –user linuxhint1 –password 123456

In the similar method, create some other iSCSI consumer linuxhint2 with a dummy password 456789 (you’ll have to trade it later) with the next command:
$ sudo tgtadm –lld iscsi –op new –mode account –user linuxhint2 –password 456789

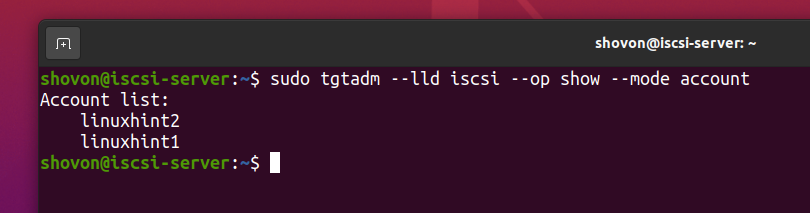
iSCSI customers linuxhint1 and linuxhint2 will have to be created, as you’ll see within the screenshot beneath:
$ sudo tgtadm –lld iscsi –op display –mode account
To permit handiest the linuxhint1 consumer get entry to to the iSCSI goal ID 1 (iqn.2021-08.com.linuxhint.iscsi:pool1.vol1) from faraway iSCSI shoppers, run the next command:
$ sudo tgtadm –lld iscsi –op bind –mode account –tid 1 –user linuxhint1

In the similar method, to permit the linuxhint2 consumer get entry to to the iSCSI goal ID 2 (iqn.2021-08.com.linuxhint.iscsi:pool1.vol2) from faraway iSCSI shoppers, run the next command:
$ sudo tgtadm –lld iscsi –op bind –mode account –tid 2 –user linuxhint2

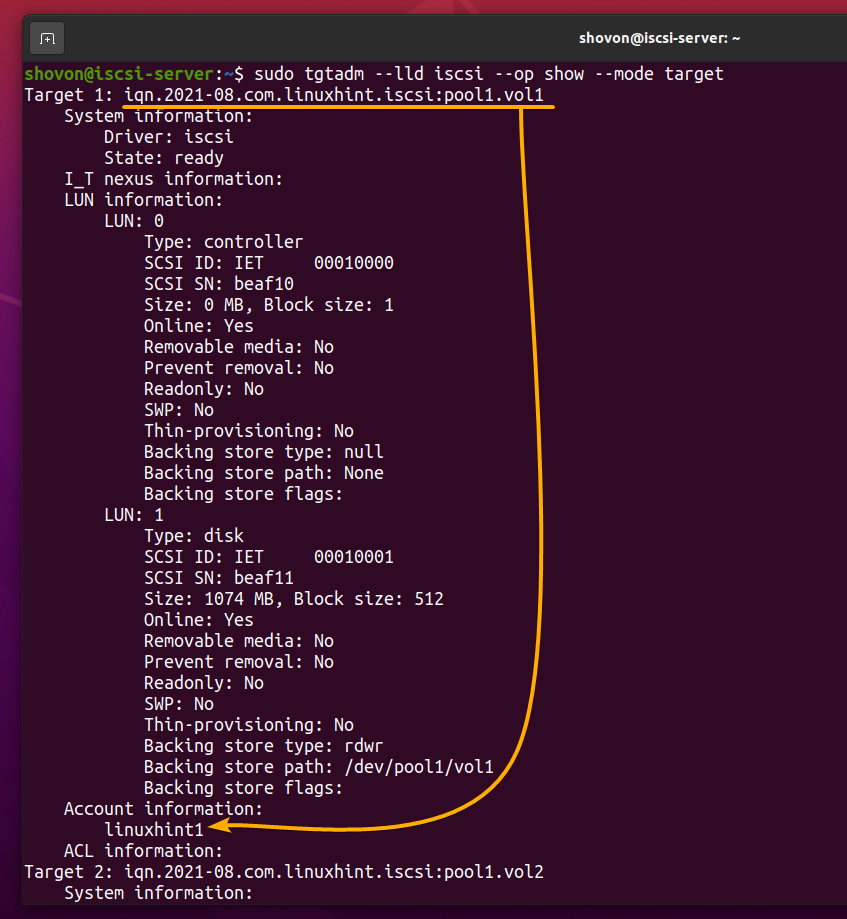
The linuxhint1 consumer account will have to be added to iSCSI goal iqn.2021-08.com.linuxhint.iscsi:pool1.vol1, as you’ll see within the screenshot beneath:
$ sudo tgtadm –lld iscsi –op display –mode goal
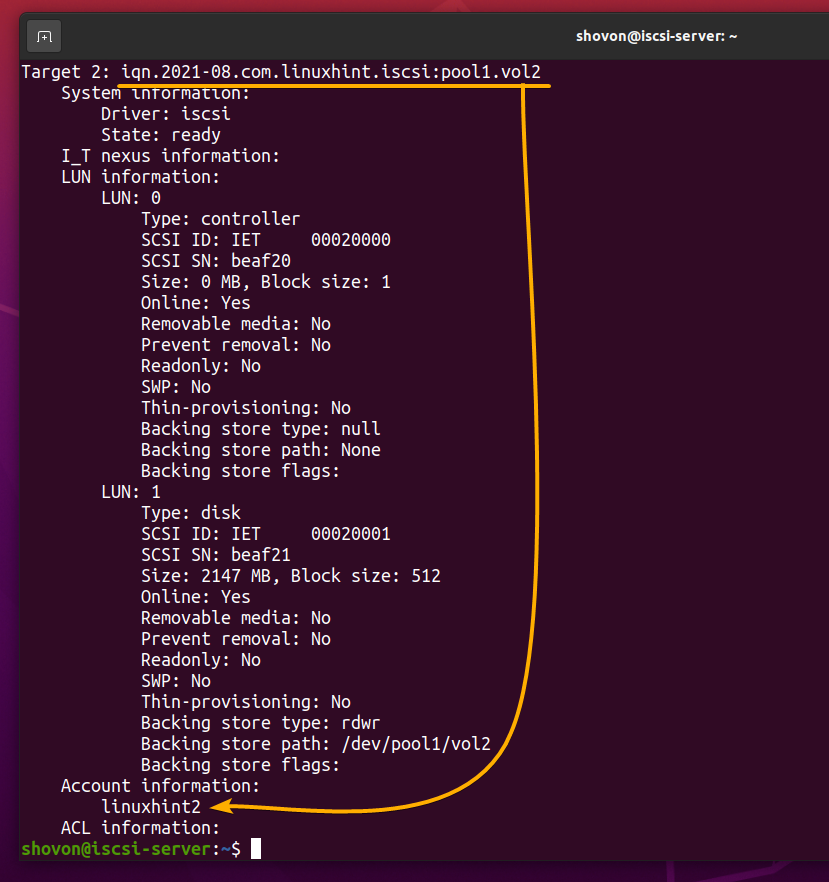
The linuxhint2 consumer account will have to even be added to iSCSI goal iqn.2021-08.com.linuxhint.iscsi:pool1.vol2, as you’ll see within the screenshot beneath:
Producing iSCSI Server Configuration:
On this segment, I’m going to turn you how you can generate a configuration report for the iSCSI server in order that the adjustments you will have made will probably be power and continue to exist device reboots.
First, permit get entry to to the iSCSI goal ID 1 (iqn.2021-08.com.linuxhint.iscsi:pool1.vol1) from any iSCSI Jstomer as follows:
$ sudo tgtadm –lld iscsi –op bind –mode goal –tid 1 –initiator-address ALL

In the similar method, permit get entry to to the iSCSI goal ID 2 (iqn.2021-08.com.linuxhint.iscsi:pool1.vol2) from any iSCSI Jstomer as follows:
$ sudo tgtadm –lld iscsi –op bind –mode goal –tid 2 –initiator-address ALL

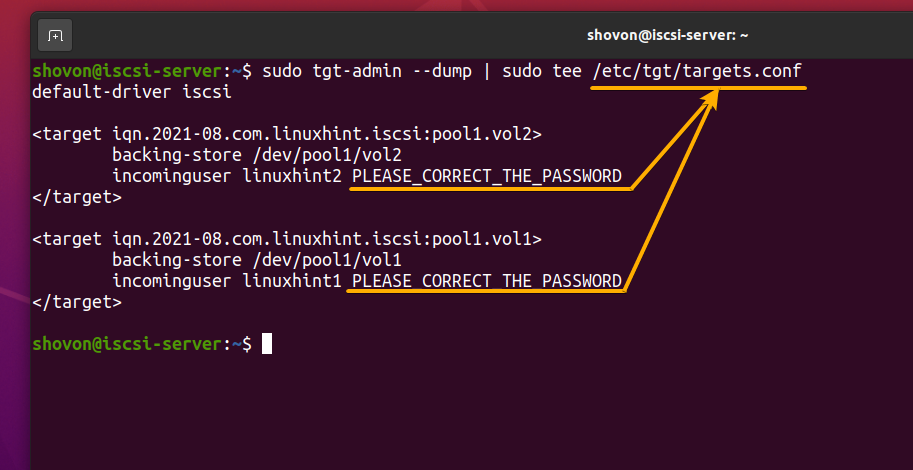
Now, sell off the present iSCSI server configuration to the iSCSI server configuration report /and many others/tgt/objectives.conf as follows:
$ sudo tgt-admin –dump | sudo tee /and many others/tgt/objectives.conf

The present iSCSI server configuration will have to be stored to the /and many others/tgt/objectives.conf report.
The consumer password may not be stored. So, you’ll have to substitute PLEASE_CORRECT_THE_PASSWORD string with the consumer password within the /and many others/tgt/objectives.conf report.
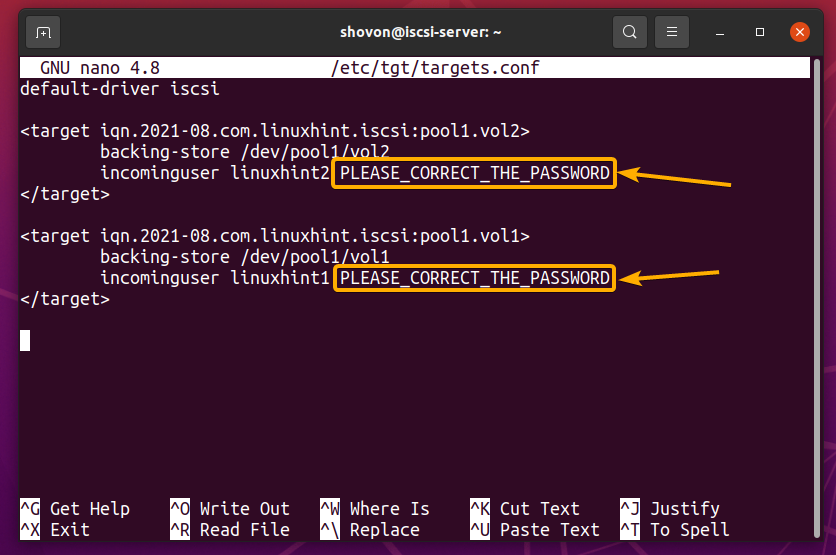
Open the iSCSI server configuration report /and many others/tgt/objectives.conf with the nano textual content editor as follows:
$ sudo nano /and many others/tgt/objectives.conf

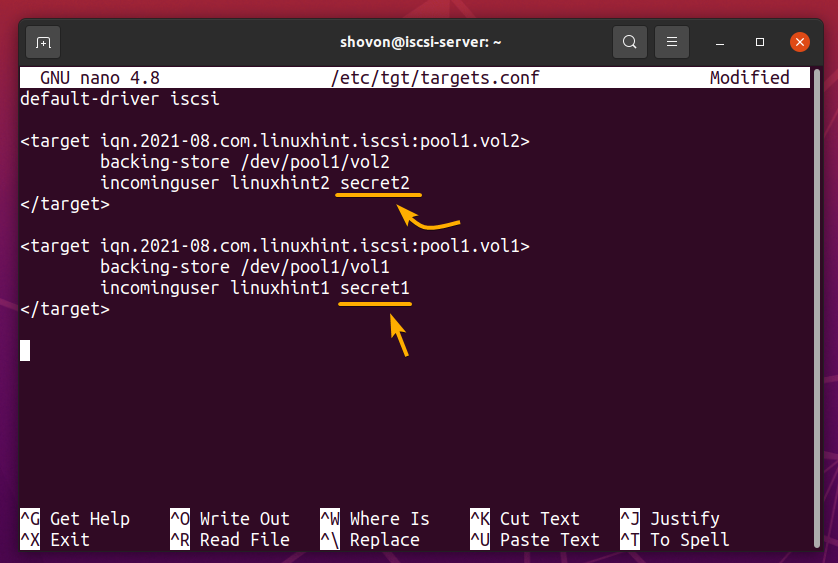
Change the strings PLEASE_CORRECT_THE_PASSWORD with the respective consumer password right here:
For the linuxhint1 consumer, I will be able to set the password secret1, and for the linuxhint2 consumer, I will be able to set the password secret2 as marked within the screenshot beneath.
As soon as you’re finished, press
For the adjustments to take impact, reboot the iscsi-server pc:
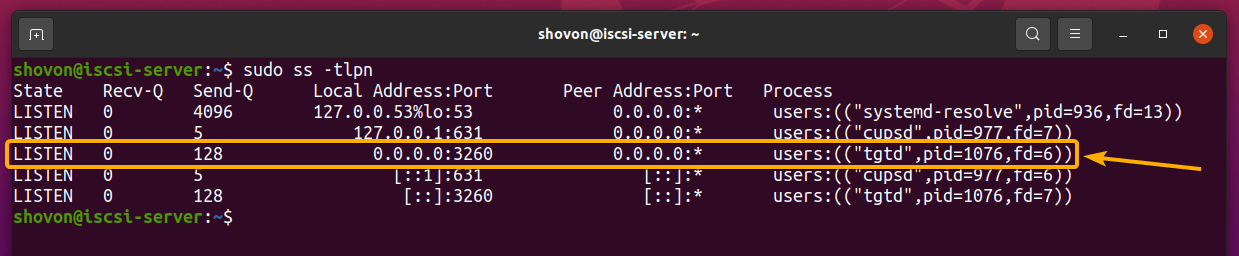
As soon as the iscsi-server pc boots, the iSCSI server will have to be operating on port 3260, as displayed within the screenshot beneath:
Gaining access to Shared ZFS Volumes by means of iSCSI:
Upon getting set the iSCSI server at the iscsi-server pc, you’ll get entry to the ZFS volumes vol1 and vol2 by means of iSCSI at the iscsi-client pc.
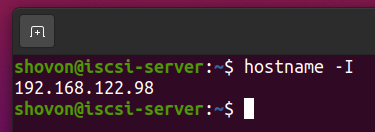
To get entry to the iSCSI objectives from the iscsi-server pc, you wish to have to understand the IP handle of the iscsi-server pc. In my case, the IP handle of my iscsi-server pc is 192.168.122.98. It’s going to be other for you. So, make sure that to interchange it with yours to any extent further.
To find all of the iSCSI objectives from the iscsi-server (IP handle 192.168.122.98), run the next command:
$ sudo iscsiadm –mode discovery –type sendtargets –portal 192.168.122.98

As you’ll see, the iSCSI objectives iqn.2021-08.com.linuxhint.iscsi:pool1.vol1 and iqn.2021-08.com.linuxhint.iscsi:pool1.vol2 are indexed.

In case you have no longer arrange authentication, you will have to have the ability to get entry to the iSCSI goal iqn.2021-08.com.linuxhint.iscsi:pool1.vol1 with the next command:
$ sudo iscsiadm –mode node –targetname iqn.2021-08.com.linuxhint.iscsi:pool1.vol1 –login

In the similar method, you’ll get entry to the iSCSI goal iqn.2021-08.com.linuxhint.iscsi:pool1.vol2 with the next command:
$ sudo iscsiadm –mode node –targetname iqn.2021-08.com.linuxhint.iscsi:pool1.vol2 –login

In case you have enabled authentication for the iSCSI objectives iqn.2021-08.com.linuxhint.iscsi:pool1.vol1 and iqn.2021-08.com.linuxhint.iscsi:pool1.vol2, you will have to obtain an authorization failure message as marked within the screenshot beneath.

To effectively log in to the authentication-enabled iSCSI objectives, set the authentication way, username, and password for every authentication-enabled iSCSI goal.
You’ll set the authentication way of the iSCSI goal iqn.2021-08.com.linuxhint.iscsi:pool1.vol1 to CHAP with the next command:
$ sudo iscsiadm –mode node –targetname iqn.2021-08.com.linuxhint.iscsi:pool1.vol1 –op replace –name node.consultation.auth.authmethod –value CHAP

You’ll set the login username of the iSCSI goal iqn.2021-08.com.linuxhint.iscsi:pool1.vol1 to linuxhint1 with the next command:
$ sudo iscsiadm –mode node –targetname iqn.2021-08.com.linuxhint.iscsi:pool1.vol1 –op replace –name node.consultation.auth.username –value linuxhint1

You’ll set the login password of the iSCSI goal iqn.2021-08.com.linuxhint.iscsi:pool1.vol1 to secret1 with the next command:
$ sudo iscsiadm –mode node –targetname iqn.2021-08.com.linuxhint.iscsi:pool1.vol1 –op replace –name node.consultation.auth.password –value secret1

As soon as you’re finished putting in place the authentication way, login username, and password for the iSCSI goal iqn.2021-08.com.linuxhint.iscsi:pool1.vol1, you will have to have the ability to effectively log in to the iSCSI goal iqn.2021-08.com.linuxhint.iscsi:pool1.vol1:
$ sudo iscsiadm –mode node –targetname iqn.2021-08.com.linuxhint.iscsi:pool1.vol1 –login

Upon getting effectively logged in to the iSCSI goal iqn.2021-08.com.linuxhint.iscsi:pool1.vol1, a brand new SCSI disk sda will have to be connected to the iscsi-client pc. Notice, it can be other for your case:
$ sudo dmesg | grep -I connected
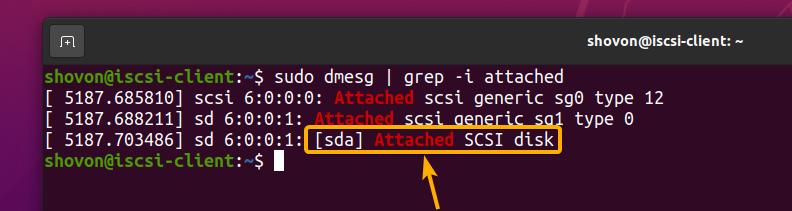
As you’ll see, a brand new garage software sda of measurement 1 GB is added to the iscsi-client pc. It’s the ZFS quantity vol1 that you’ve got shared by means of iSCSI:

In the similar method, set the authentication way of the iSCSI goal iqn.2021-08.com.linuxhint.iscsi:pool1.vol2 to CHAP with the next command:
$ sudo iscsiadm –mode node –targetname iqn.2021-08.com.linuxhint.iscsi:pool1.vol2 –op replace –name node.consultation.auth.authmethod –value CHAP

Set the login username of the iSCSI goal iqn.2021-08.com.linuxhint.iscsi:pool1.vol2 to linuxhint2 with the next command:
$ sudo iscsiadm –mode node –targetname iqn.2021-08.com.linuxhint.iscsi:pool1.vol2 –op replace –name node.consultation.auth.username –value linuxhint2

Set the login password of the iSCSI goal iqn.2021-08.com.linuxhint.iscsi:pool1.vol2 to secret2 with the next command:
$ sudo iscsiadm –mode node –targetname iqn.2021-08.com.linuxhint.iscsi:pool1.vol2 –op replace –name node.consultation.auth.password –value secret2

Log in to the iSCSI goal iqn.2021-08.com.linuxhint.iscsi:pool1.vol2 with the next command:
$ sudo iscsiadm –mode node –targetname iqn.2021-08.com.linuxhint.iscsi:pool1.vol2 –login

You will have to have the ability to effectively log in to the iSCSI goal iqn.2021-08.com.linuxhint.iscsi:pool1.vol2:

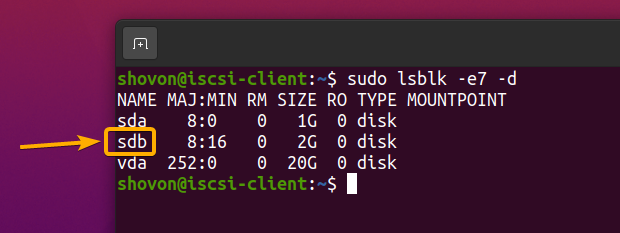
Upon getting effectively logged in to the iSCSI goal iqn.2021-08.com.linuxhint.iscsi:pool1.vol2, a brand new SCSI disk sdb will have to be connected to the iscsi-client pc. Notice, it can be other for your case.
$ sudo dmesg | grep -I connected
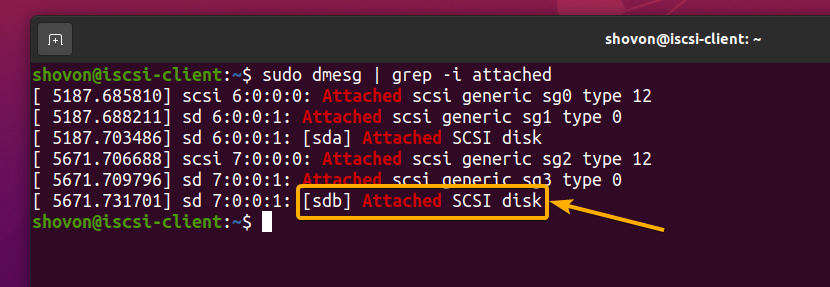
As you’ll see, a brand new garage software sdb of measurement 2 GB is added to the iscsi-client pc. It’s the ZFS quantity vol2 that you’ve got shared by means of iSCSI:
Mechanically Mounting Shared ZFS Volumes by means of iSCSI:
To robotically log in to an iSCSI goal, you’ll have to set the node.startup assets of the iSCSI goal to computerized.

To set the node.startup assets of the iSCSI goal iqn.2021-08.com.linuxhint.iscsi:pool1.vol1 to computerized, run the next command:
$ sudo iscsiadm –mode node –targetname iqn.2021-08.com.linuxhint.iscsi:pool1.vol1 –op replace –name node.startup –value computerized
To set the node.startup assets of the iSCSI goal iqn.2021-08.com.linuxhint.iscsi:pool1.vol2 to computerized, run the next command:
$ sudo iscsiadm –mode node –targetname iqn.2021-08.com.linuxhint.iscsi:pool1.vol2 –op replace –name node.startup –value computerized

In the end, permit the open-iscsi systemd carrier in order that it begins robotically at boot time with the next command:
$ sudo systemctl permit open-iscsi

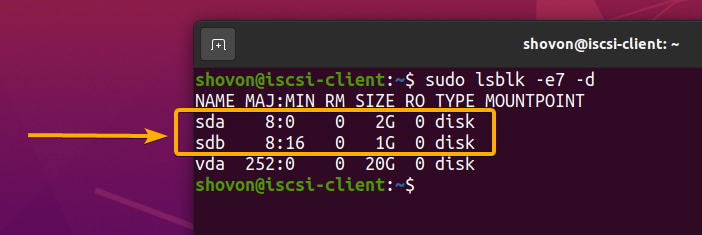
For the adjustments to take impact, restart the iscsi-client pc with the next command:

As soon as the iscsi-client pc boots, you will have to see the sda and sdb garage gadgets at the iscsi-client pc as marked within the screenshot beneath:
Conclusion:
On this article, I’ve proven you how you can create ZFS volumes and percentage them by means of iSCSI. Additionally, I’ve proven you how you can arrange authentication for iSCSI objectives. I’ve proven you how you can log in to the iSCSI objectives remotely and get entry to the shared ZFS volumes.
References:
[1] Ubuntu Manpage: tgtadm – Linux SCSI Goal Management Software
[2] Ubuntu Manpage: tgt-admin – Linux SCSI Goal Configuration Software
[3] Ubuntu Manpage: iscsiadm – open-iscsi management application