UEFI (Unified EFI – Extensible Firmware Interface) is a software specification used to interface between the operating system and the firmware of your computer’s hardware.
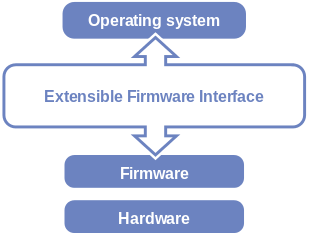
Fig 1: The position of EFI in the software stack (source: Wikipedia¹)
UEFI has a built-in shell program called UEFI Shell or EFI Shell. You can use it to run EFI Shell commands and run your own EFI scripts.
This article will show you how to write UEFI/EFI Shell scripts and run them from the UEFI/EFI Shell. So, let’s get started.
Table of Contents:
- Starting the UEFI Shell
- Learning the Basic EFI Shell Commands
- UEFI Shell Script Extension
- Writing Your First UEFI/EFI Shell Script
- Hiding Script Lines From Being Displayed
- Making the Script Readable with Comments
- Working with Environment Variables
- Working with Command-Line Arguments
- Shifting Command Line Arguments
- Decision Making with if Statement
- Inverting Conditions with if Statement
- Chaining Conditions with if Statement
- Implementing Less Than Equal To with Condition Chaining
- Implementing Greater Than Equal To with Condition Chaining
- Decision Making with if-else Statement
- Checking for File or Directory Existence
- Exiting from Shell Scripts
- Checking Command Success Status
- Working with for Loops
- Woking with Ranged for Loops
- Jumping in the Code
- Conclusion
- References
Starting the UEFI Shell:
If you need any help starting the UEFI Shell, check the article How to Use UEFI Interactive Shell and Its Common Commands.
Learning the Basic EFI Shell Commands:
Shell scripting is nothing more than running a series of shell commands. So, to be good at shell scripting, you must be good at using the shell commands. To learn how to use the basic EFI Shell commands, read the article How to Use UEFI Interactive Shell and Its Common Commands.
UEFI Shell Script Extension:
The UEFI or EFI Shell script files have the extension nsh. So, the UEFI or EFI Shell scripts you create should end with .nsh.
Writing Your First UEFI/EFI Shell Script:
In this section, I will show you how to write your first UEFI or EFI Shell script.
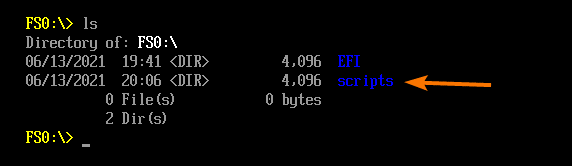
I will create all the scripts of this article in the FS0 storage device, as you can see in the screenshot below. It is usually the first FAT-32 formatted EFI System Partition of your computer.
NOTE: If you want, you can use a USB thumb drive or any other storage device. It must be FAT-32 or FAT-16 formatted for this to work.
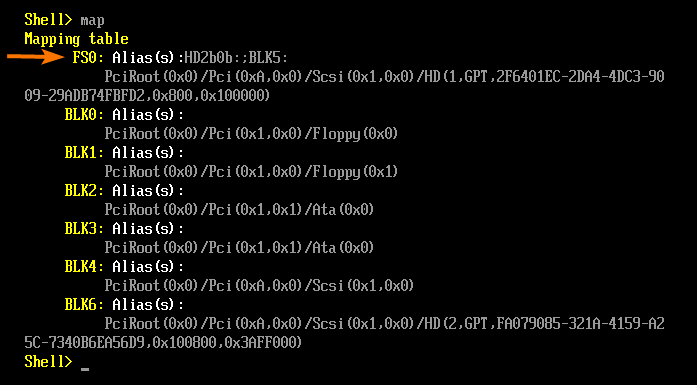
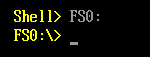
You can navigate to the FS0 storage device with the following EFI Shell command:
You should have only an EFI directory on your FS0 storage device.
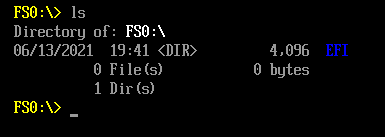
Create a new directory scripts to keep all your EFI Shell scripts organized.
![]()
![]()
As you can see, a new directory scripts is created.
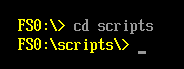
Navigate to the scripts directory as follows:
Now, I will show you how to write a simple EFI Shell script print_hello.nsh. This script will print the text Hello World on the screen. A very simple thing to do for your very first EFI Shell script.
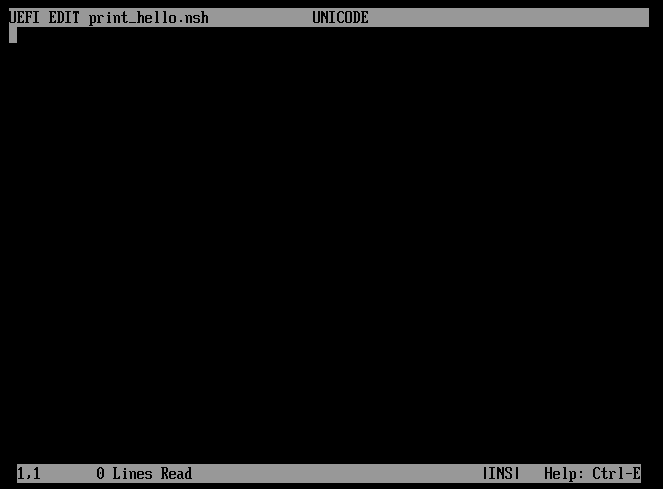
Create a new EFI shell script print_hello.nsh and open it with the EFI Shell text editor as follows:
FS0:scripts> edit print_hello.nsh
![]()
![]()
The EFI Shell text editor should be opened. You can type in your EFI Shell script here.
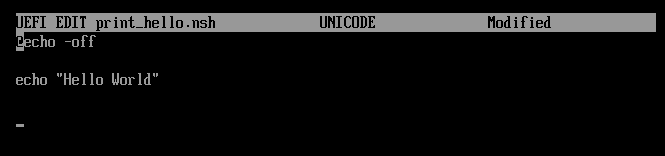
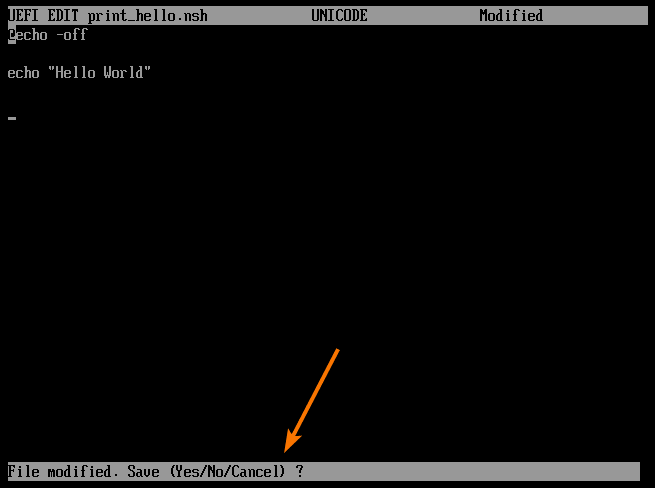
To print the text Hello World on the screen, you have to type in the following lines of codes in the print_hello.nsh file.
Once you’re done, press <F3>. You will see the following prompt. To save the changes, press Y.
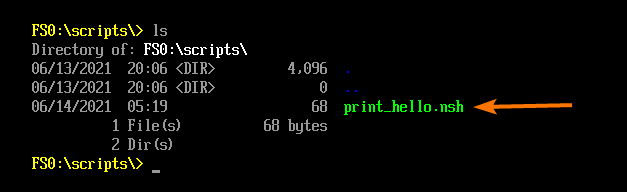
As you can see, a new file print_hello.nsh is created in the FS0:scripts directory.
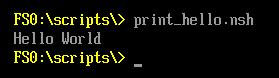
To run the print_hello.nsh EFI Shell script, run the following command:
FS0:scripts> print_hello.nsh
![]()
![]()
As you can see, the print_hello.nsh script executed, and Hello World is printed on the screen.
You’ve successfully written and executed your first EFI Shell script. Congratulations!
In the next sections, I will show you different things you can do with EFI Shell scripts. So, let’s move on.
Hiding Script Lines From Being Displayed:
By default, when you run an EFI Shell script, each line of code will be printed before the output of that line.
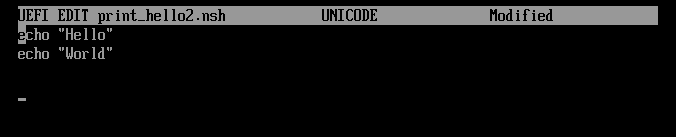
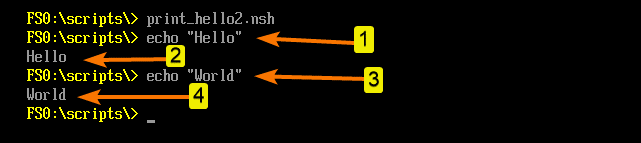
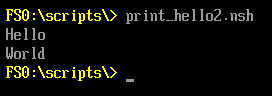
To demonstrate what I mean, create a new EFI Shell script print_hello2.nsh and type in the following lines of codes:
FS0:scripts> edit print_hello2.nsh
Now, run the script print_hello2.nsh as follows:
FS0:scripts> print_hello2.nsh
![]()
![]()
As you can see, the script print_hello2.nsh prints the commands (lines 1 and 4) and their respective outputs (lines 2 and 3).
If you want to prevent the command lines from being displayed when you run the script, you can use @ symbol before the command lines that you want to prevent from being displayed.
For example, to only hide the command echo “World” from being displayed, when you run the print_hello2.nsh script, you can add @ symbol before the echo “World” command as follows:
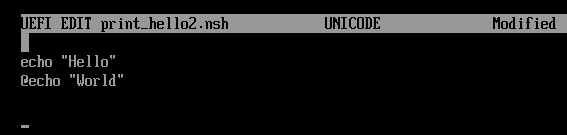
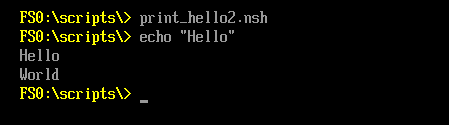
As you can see, I used @ symbol before the command echo “World,” and it is not displayed when I ran the print_hello2.nsh script. But the command echo “Hello” is printed as I did not add a @ symbol before the command.
FS0:scripts> print_hello2.nsh
Adding @ symbol before every line of command is not very practical if you have a long script. Luckily, you can turn off command printing for the entire script.
To do that, add the line @echo -off at the start of your EFI Shell script as follows:
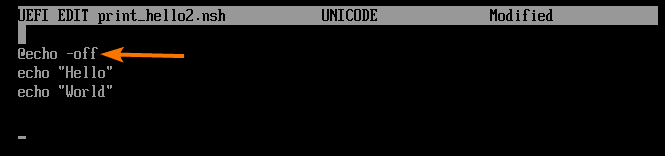
Now, if you run the script, command lines won’t be printed anymore. Only the output of the command lines will be printed, as you can see in the screenshot below.
FS0:scripts> print_hello2.nsh
Making the Script Readable with Comments:
Comments are lines of text that have no meaning to the script. It is there only for documentation purposes. Imagine writing 1000 or more lines of codes in your EFI Shell script, and you look back at it after a few months. I am pretty sure most of you won’t be able to remember why you wrote what you wrote in that EFI Shell script. It will take a while to figure out how the shell script works. Comments can help you with this problem. Comments will make your EFI Shell script easy to understand for you and other people.
On your EFI Shell script, you can add the # sign at the start of a line to make it a single-line comment.
To experiment with comments, create a new script comment1.nsh and type in the following lines of codes in it.
FS0:scripts> edit comment1.nsh
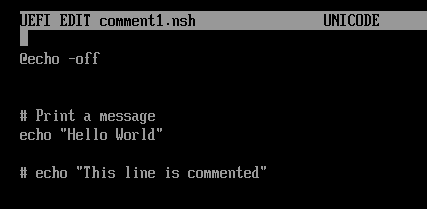
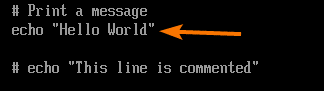
Here, the marked lines are comments. They will not be executed.

This line is not a comment. This line will execute and print the message Hello World.
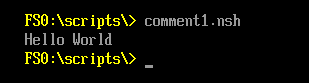
Once you run the comment1.nsh EFI Shell script, only the echo “Hello World” line will be executed, and the message Hello World will be printed, as you can see in the screenshot below.
FS0:scripts> comment1.nsh
Working with Environment Variables:
You can list all the environment variables of your EFI Shell with the following command:
![]()
![]()
All the environment variables of your EFI Shell should be listed. You can access them from your EFI Shell script.
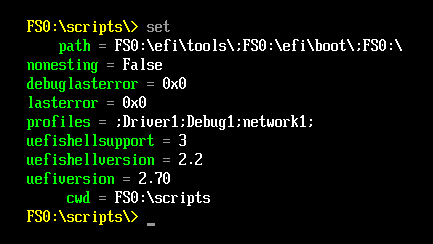
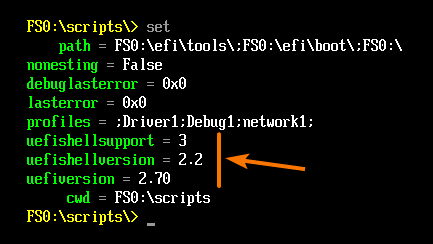
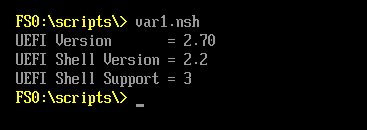
Let’s say you want to access the environment variables uefishellsupport, uefishellversion, and uefiversion from the EFI Shell script var1.nsh.
To do that, type in the following lines of codes in the var1.nsh file.
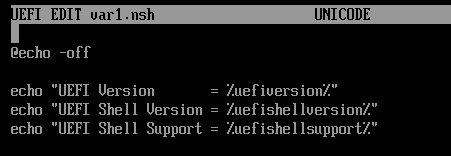
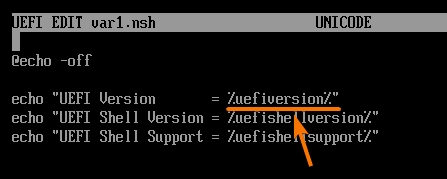
You have to enclose them with the % symbol (i.e., %env_var_name%) to access environment variables, as shown in the screenshot below.
Once you’re done, run the var1.nsh script.
![]()
![]()
The value of your desired environment variables should be printed, as you can see in the screenshot below.
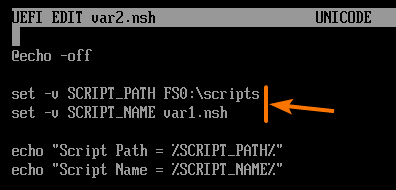
You can also set your own environment variables from EFI Shell scripts. To do that, you can use the set command in your EFI Shell script in the same way you do from your EFI Shell.
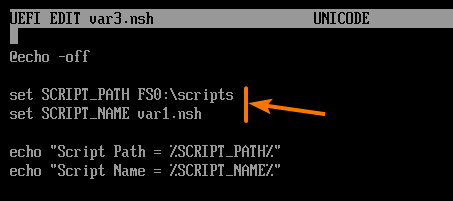
To set volatile (won’t survive system reboots) environment variables SCRIPT_PATH and SCRIPT_NAME from the EFI Shell script var2.nsh, write the set command as follows:
FS0:scripts> edit var2.nsh
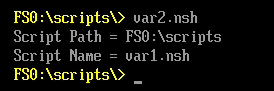
Once you run the var2.nsh script, print the environment variables that you’ve set, as you can see in the screenshot below.
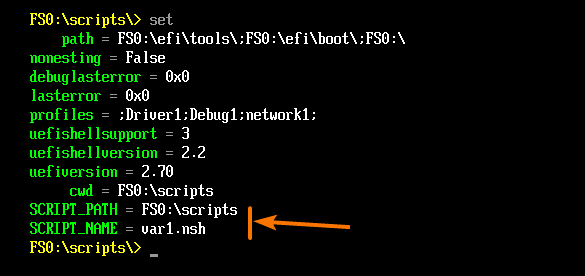
Now, list all the environment variables of your EFI Shell using the set command. The environment variables that you’ve set from the var2.nsh script should be there, as you can see in the screenshot below.
You can set non-volatile (will survive system reboots) environment variables from EFI Shell scripts as well.
To do that, write the set command without any command-line options as marked in the screenshot below.
You can remove EFI Shell environment variables from EFI Shell scripts.
To do that, write the set command with the -d option followed by the environment variable name (SCRIPT_PATH and SCRIPT_NAME) that you want to remove as shown in the var4.nsh EFI Shell script.
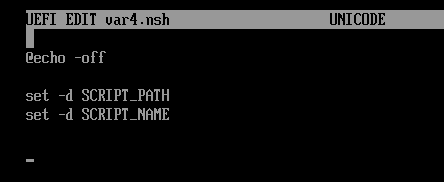
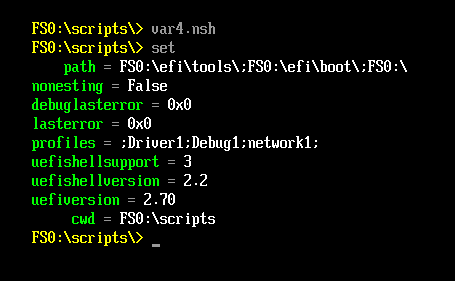
Once you run the var4.nsh script, the environment variables SCRIPT_PATH and SCRIPT_NAME should be removed, as you can see in the screenshot below.
FS0:scripts> set
Working with Command-Line Arguments:
You can work with command-line arguments from the EFI Shell scripts.
To experiment with command-line arguments, create a new EFI Shell script args1.sh as follows:
FS0:scripts> edit args1.nsh
![]()
![]()
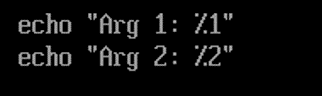
Type in the following lines of codes and save the args1.nsh file.
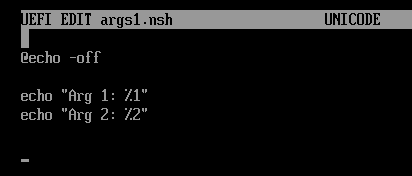
Here, you use %1 to access the first command-line argument and %2 to access the second command-line argument.
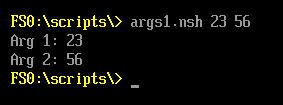
Now, run the args1.nsh script with the command line arguments 23 and 56 as follows:
FS0:scripts> args1.nsh 23 56
![]()
![]()
The command-line arguments should be printed on the screen, as you can see in the screenshot below.
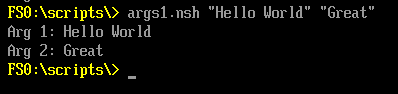
You can also pass strings as command-line arguments to the args1.nsh script.
FS0:scripts> args1.nsh “Hello World” “Great”
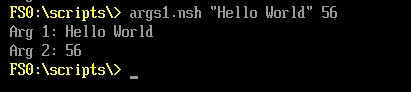
You can mix string and integers as command-line arguments as well.
FS0:scripts> args1.nsh “Hello World” 56
In the same way, you can use %3 to access the third command-line argument, %4 to access the fourth command-line argument, and so on.
This way, you can access up to nine command-line arguments %1 to %9. You won’t be able to access more than nine command-line arguments. So, there will be no %11, %12, %13, and so on.
Shifting Command Line Arguments:
In the last section, I have told you that you won’t access more than 9 command-line arguments. That’s true. But, there is a way to access more than 9 command-line arguments.
You can use the shift command on your EFI Shell scripts to shift command-line arguments to access more than 9 command-line arguments.
shift command does exactly what it says. It moves the command-line arguments one level up.
Let’s say we have some command-line arguments.
A B C D E F G H I J K L M N O P Q R S T
We can access A-I using %1-%9. So,
%1=A, %2=B, %3=C, %4=D, %5=E, %6=F, %7=G, %8=H, %9=I
If you use the shift command once, everything shifts one level up. So,
%1=B, %2=C, %3=D, %4=E, %5=F, %6=G, %7=H, %8=I, %9=J
If you use the shift command again, everything shifts one level up. So,
%1=C, %2=D, %3=E, %4=F, %5=G, %6=H, %7=I, %8=J, %9=K
If you use the shift command again, everything shifts one level up. So,
%1=D, %2=E, %3=F, %4=G, %5=H, %6=I, %7=J, %8=K, %9=L
You get the idea. You can go on like this as long as you want.
To experiment with command-line argument shifting, create a new EFI Shell script args2.nsh as follows:
FS0:scripts> edit args2.nsh
![]()
![]()
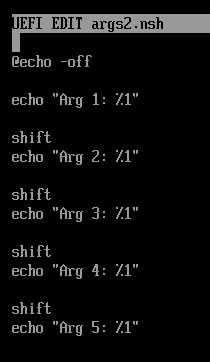
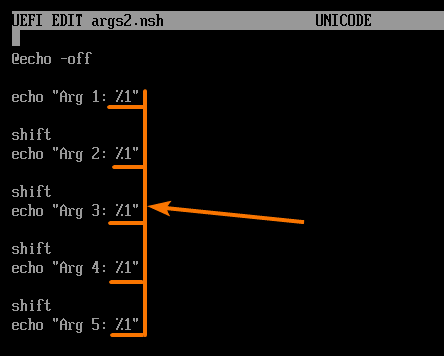
Type in the following lines of codes in the args2.nsh script.
Once you’re done, run the args2.nsh script as follows:
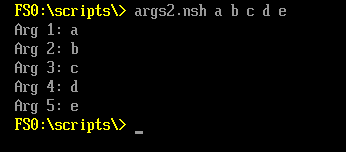
FS0:scripts> args2.nsh a b c d e
![]()
![]()
As you can see, all the command-line arguments are printed.
Notice that I have used the only %1 to print all the command-line arguments. This is what the shift command allows you to do.
In a later section of this article, I will show you how to combine the shift command and the jump feature of the shell to print command-line arguments using only a few lines of code.
Decision Making with if Statement:
Running codes depending on some conditions is a key part of shell scripting. You can do that in EFI Shell scripts as well.
To check for conditions and running codes depending on that condition, you use the if statement in your EFI Shell scripts.
The format of the if statement is as follows:
your code goes here
endif
Here, if the condition is true, then the code runs.
The condition can check for the following things:
Equality – checks if an environment variable or command-line argument is equal to some value (string and number) or some other environment variable or command-line argument.
Less than – checks if an environment variable or command-line argument is less than some value (number) or some other environment variable or command-line argument.
Greater than – checks if an environment variable or command-line argument is greater than some value (number) or some other environment variable or command-line argument.
First, I will show you how to check for equality.
To experiment with equality tests, create a new script if1.nsh as follows:
FS0:scripts> edit if1.nsh
![]()
![]()
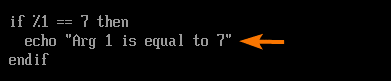
Type in the following lines of codes in the if1.nsh script.
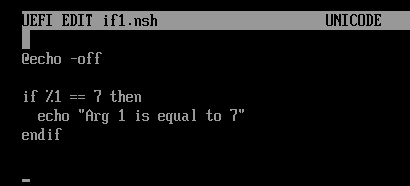
Here, %1 == 7 is used to check if the first command-line argument (%1) is equal to 7.

If the first command-line argument %1 is equal to 7, then print Arg 1 is equal to 7 to the screen.
Once you’re done writing the if1.nsh script, run it with different command-line arguments. As you can see, Arg 1 is equal to 7 is printed only when the command-line argument is 7. In other cases, the script if1.nsh prints nothing on the screen. So, equality check works.
FS0:scripts> if1.nsh 7
FS0:scripts> if1.nsh 8

Now that you know how the if statement works and how to check for equality with the if statement, it will be very easy to understand the less than and greater than checks.
To experiment with these, create a new script if2.nsh and type in the following lines of codes.
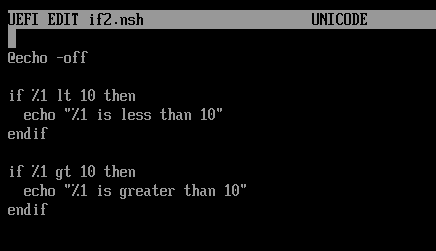
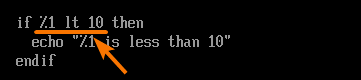
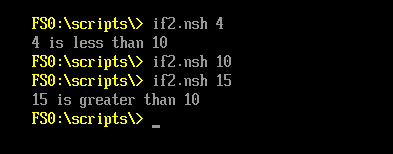
To check whether the first command-line argument %1 is less than 10, you use the lt keyword as marked in the screenshot below.
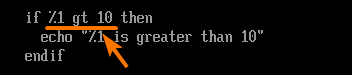
In the same way, to check whether the first command-line argument %1 is greater than 10, you use the gt keyword as marked in the screenshot below.
Now, run the if2.nsh script with different command-line arguments, and the correct section of the code will run depending on the value of the command-line argument, as you can see in the screenshot below.
FS0:scripts> if2.nsh 10
FS0:scripts> if2.nsh 15
Inverting Conditions with if Statement:
You can use the not keyword to invert the condition of your if statement. So, if the condition is true, then not condition will be false. It is used to run a section of code when then the condition is false.
The format of the if statement with the inverted condition is as follows:
your code goes here
endif
Here, if the condition is false, then the code runs.
To experiment with the inverted condition, create a new script if3.nsh as follows:
FS0:scripts> edit if3.nsh
![]()
![]()
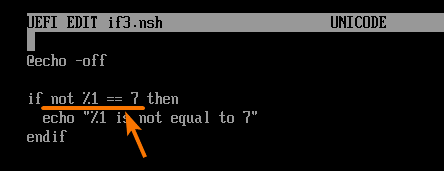
Now, type in the following lines of codes in the if3.nsh script.
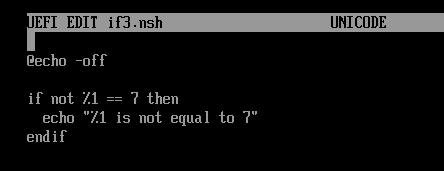
Here, the condition is %1 == 7. The condition will be true if the first command-line argument is equal to 7. As you have a not keyword before the condition, the code will run when the condition is false. That is when the first command-line argument is not equal to 7.
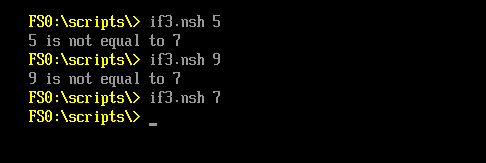
Now, run the if3.nsh script with different command-line arguments, and it should print a message only when the command-line argument is not 7, as you can see in the screenshot below.
FS0:scripts> if3.nsh 9
FS0:scripts> if3.nsh 7
Chaining Conditions with if Statement:
You can use the “and” “or” keyword to chain multiple conditions with your if statement.
In the case of the and keyword, the code section will run only if all the chained conditions are true.
In the or keyword, the code section will run only if one of the chained conditions is true.
The format of the and condition chaining with if statement is:
code goes here
endif
The format of the or condition chaining with if statement is:
code goes here
endif
To experiment with the and condition chaining, create a new script if4.nsh as follows:
FS0:scripts> edit if4.nsh
![]()
![]()
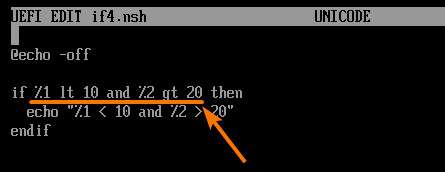
Type in the following lines of codes in the if4.nsh script.
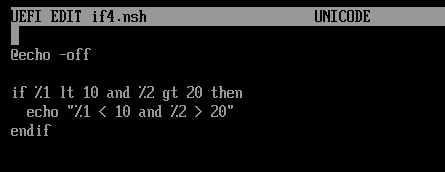
Here, the condition %1 lt 10 and the condition %2 gt 20 are chained with the and keyword.
So, the first command-line argument %1 must be less than 10, and the second command-line argument %2 must be greater than 20 for both the conditions to be true, and only then the code section will run.
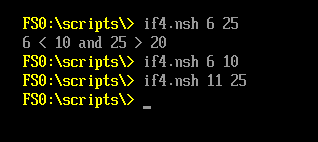
Now, run the if4.nsh script with different sets of command-line arguments, and you should see that output is printed only when both the conditions are true.
FS0:scripts> if4.nsh 6 10
FS0:scripts> if4.nsh 11 25
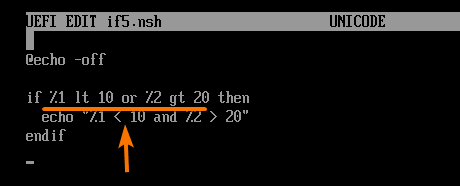
To experiment with the or condition chaining, create a new script if5.nsh and type in the following lines of codes.
FS0:scripts> edit if5.nsh
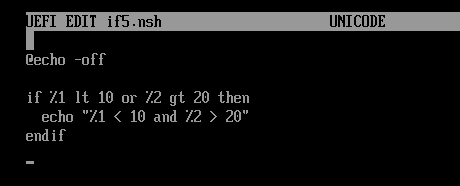
Here, the condition %1 lt 10 and the condition %2 gt 20 are chained with the keyword.
So, either the first command-line argument %1 must be less than 10, or the second command-line argument %2 must be greater than 20 for the code section to run. In another word, one of the conditions must be true for the code section to run.
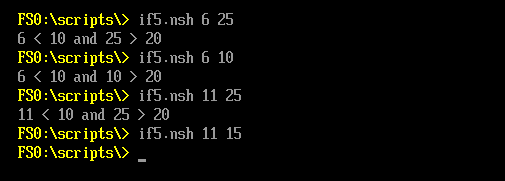
Now, run the if5.nsh script with different sets of command-line arguments, and you should see that output is printed only when one of the conditions is true.
FS0:scripts> if4.nsh 6 10
FS0:scripts> if4.nsh 11 25
FS0:scripts> if4.nsh 11 15
Implementing Less Than Equal To with Condition Chaining:
EFI Shell script does not have any built-in method (i.e., <= operator) to check whether the value of a command-line argument or environment variable is less than or equal to something. Luckily, you can use condition chaining to implement the less than equal check feature on your EFI Shell script. In this section, I am going to show you how to do that.
First, create a new shell script if6.nsh as follows:
FS0:scripts> edit if6.nsh
![]()
![]()
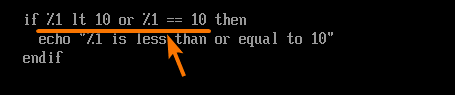
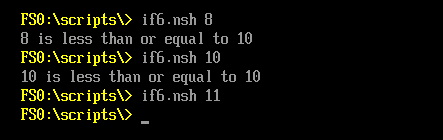
Type in the following lines of codes in the if6.nsh script.
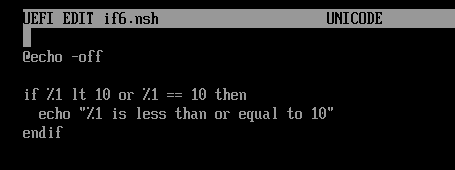
If the first command-line argument %1 is less than 10 or equal to 10, then the code section will run.
Now, run the if6.nsh script with different command-line arguments, and you should see that output is printed only when the command-line argument is less than or equal to 10.
FS0:scripts> if6.nsh 10
FS0:scripts> if6.nsh 11
Implementing Greater Than Equal To with Condition Chaining:
EFI Shell script does not have any built-in method (i.e., >= operator) to check whether the value of a command-line argument or environment variable is greater than or equal to something. Luckily, you can use condition chaining to implement the greater than equal check feature on your EFI Shell script. In this section, I am going to show you how to do that.
First, create a new shell script if7.nsh as follows:
FS0:scripts> edit if7.nsh
![]()
![]()
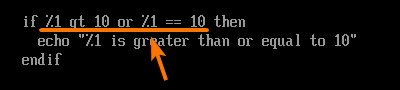
Type in the following lines of codes in the if7.nsh script.
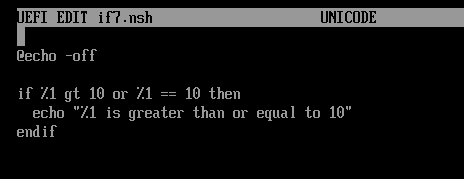
If the first command-line argument %1 is greater than 10 or equal to 10, then the code section will run.
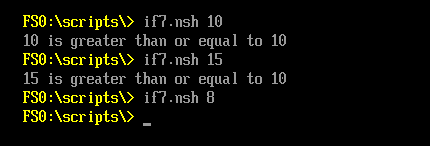
Now, run the if7.nsh script with different command-line arguments, and you should see that output is printed only when the command-line argument is greater than or equal to 10.
FS0:scripts> if7.nsh 15
FS0:scripts> if7.nsh 8
Decision Making with if-else Statement:
You can use the if-else statement to run a section of codes if some condition is true and run another section of codes if it’s false.
The format of the if-else statement is:
code section 1
else
code section 2
endif
Here, if the condition is true, then code section 1 runs. If the condition is false, then code section 2 runs.
To experiment with the if-else statement, create a new script if-else1.nsh as follows:
FS0:scripts> edit if-else1.nsh
![]()
![]()
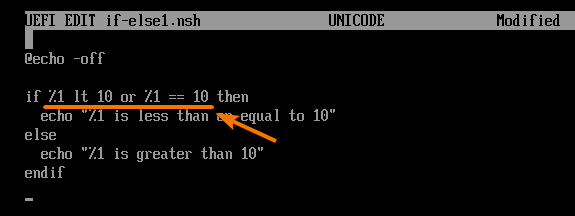
Type in the following lines of codes in the if-else1.nsh script.
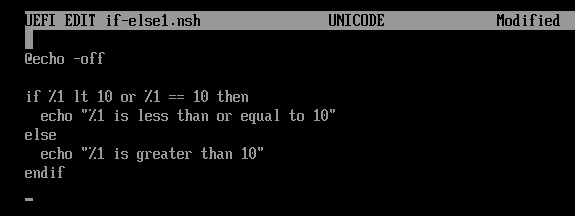
Here, if the first command-line argument %1 is less than or equal to 10, then the line echo “%1 is less than or equal to 10” runs. Otherwise, the line echo “%1 is greater than 10” runs.
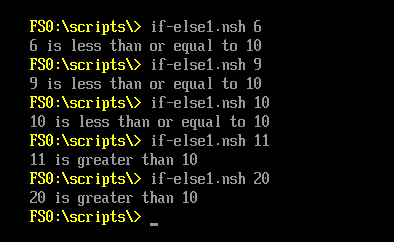
Now, run the if-else1.nsh script with different command-line arguments, and you should see that the correct output is printed depending on whether the command-line argument is less than or equal to 10 or greater than 10 (not less than or equal to 10).
FS0:scripts> if-else1.nsh 9
FS0:scripts> if-else1.nsh 10
FS0:scripts> if-else1.nsh 11
FS0:scripts> if-else1.nsh 20
Checking for File or Directory Existence:
It is a common task to check for file or directory existence from shell scripts. It is not different for EFI Shell scripts.
The exist keyword is used to check for file or directory existence in EFI Shell scripts.
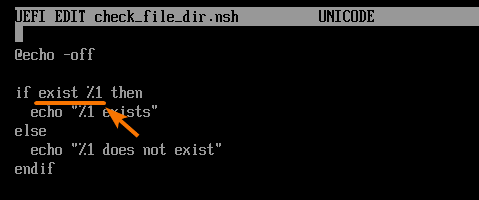
To experiment with file or directory existence checking, create a new script check_file_dir.nsh as follows:
FS0:scripts> edit check_file_dir.nsh

Type in the following lines of codes in the check_file_dir.nsh script.
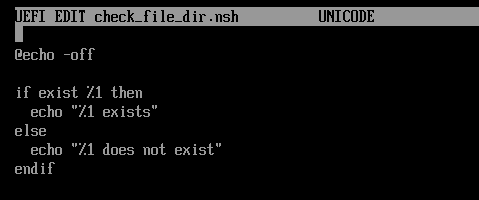
Here, the marked section checks whether the file/directory provided by the first command-line argument exists. Depending on whether the file/directory exists, a message is printed on the screen.
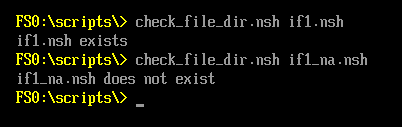
Now, run the check_file_dir.nsh script with a filename that exists and again with a filename that does not. It should tell you whether the file exists or not, as you can see in the screenshot below.
FS0:scripts> check_file_dir.nsh if1_na.nsh
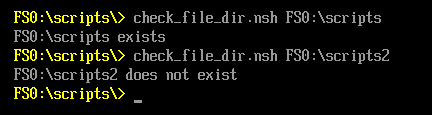
In the same way, run the check_file_dir.nsh script with a directory name/path that exists and again with one that does not. It should tell you whether the directory exists or not, as you can see in the screenshot below.
FS0:scripts> check_file_dir.nsh FS0:scripts2
Exiting from Shell Scripts:
There are times when you need to terminate your shell script midway. Let’s say your shell script must have some command-line arguments to function properly. You can check whether the correct number of command-line arguments is supplied at the shell script’s beginning. If not, you can prematurely terminate your shell script and probably save yourself from disasters.
On EFI Shell scripts, you can use the exit command to terminate it prematurely. Let’s see how that works.
First, create a new shell script exit_status.nsh as follows:
FS0:scripts> edit exit_status.nsh
![]()
![]()
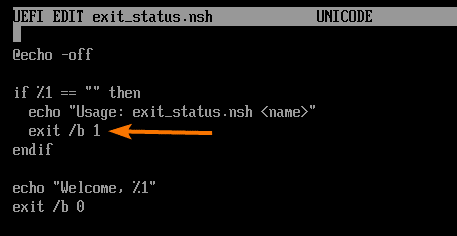
Type in the following lines of codes in the exit_status.nsh script.
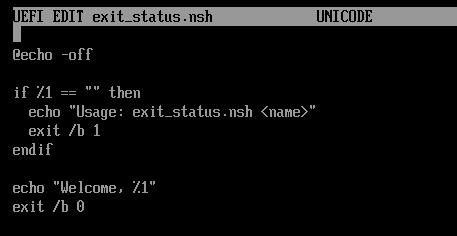
Here, if the first command-line argument is not available, %1 == “” is true. In that case, the exit /b 1 command is used to terminate the exit_status.nsh script with the return code 1.
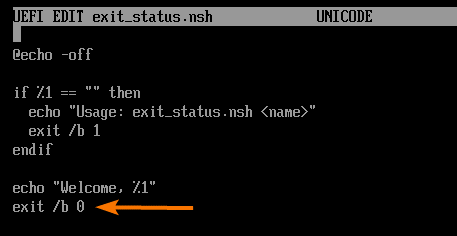
In the same way, you can use exit /b 0 at the end of the exit_status.nsh script to terminate it with the return code 0 (success) when the script finishes executing.
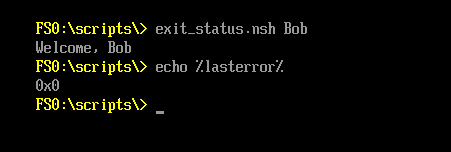
Now, run the exit_status.nsh script with a command-line argument, and you should see that the script runs as expected and the return code is 0x0 (0 – success).
FS0:scripts> echo %lasterror%
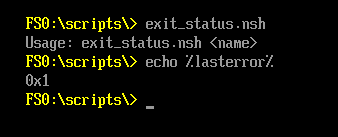
In the same way, run the exit_status.nsh script without a command-line argument, and you should see that the script prints the usage information and terminates with the return code 0x1 (1).
FS0:scripts> echo %lasterror%
Checking Command Success Status:
In the same way, you can use the %lasterror% environment variable to check whether a command ram successfully from your EFI Shell scripts.
To find out how the %lasterror% environment variable changes its value depending on whether a command ran successfully or not, create a new shell script check_success.nsh as follows:
FS0:scripts> edit check_success.nsh
![]()
![]()
Type in the following lines of codes in the check_success.nsh script.
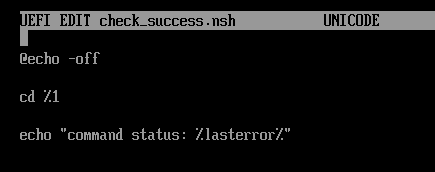
This script tries to navigate to the directory path provided by the first command-line argument. Then it prints the value of the %lasterror% environment variable.
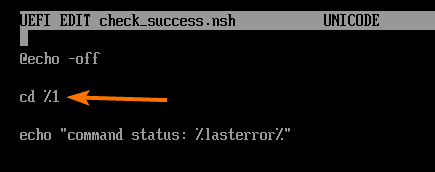
Now, run the check_success.nsh script with a valid directory path and again with an invalid directory path. You should see that the value of the %lasterror% environment variable is 0x0 when the cd command succeeds and 0xF when it fails.
FS0:scripts> check_success.nsh FS0:scripts2

Now, let’s see how to use the %lasterror% environment variable in your EFI shell script to check whether the last command failed or not.
Create a new script check_run.nsh and type in the following lines of codes.
FS0:scripts> edit check_run.nsh
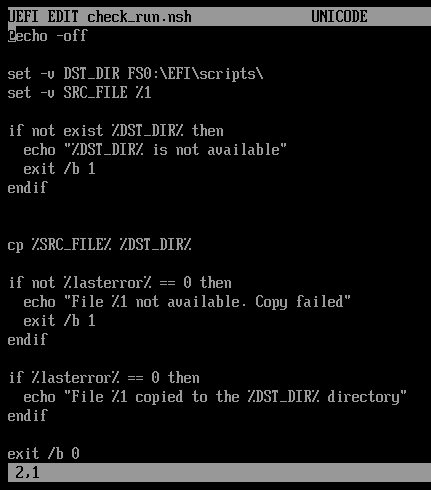
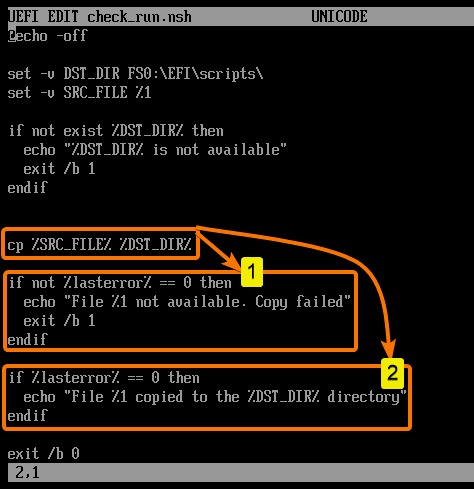
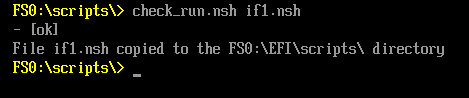
If the statement checks whether the cp command failed, the %lasterror% environment variable is not equal to 0. If it failed, then an error message is printed, and the script terminates.
The second if statement checks whether the cp command succeeded – the %lasterror% environment variable equals 0. In that case, print a success message.
The first time you run the check_run.nsh script, it may tell you that the directory (FS0:EFIscripts) where you want to copy the file (first command-line argument) does not exist.
FS0:scripts> check_run.nsh if1.nsh

In that case, run the following command to create the directory FS0:EFIscripts:
FS0:scripts> mkdir FS0:EFIscripts
![]()
![]()
Now, try to copy a file that exists with the check_run.nsh script and it should succeed, as you can see in the screenshot below.
FS0:scripts> check_run.nsh if1.nsh
Now, try to copy a file that does not exist with the check_run.nsh script and it should fail, as you can see in the screenshot below.
FS0:scripts> check_run.nsh if1_na.nsh

Working with for Loops:
You can use the for loop on your EFI Shell scripts to run the same code repeatedly.
The format of the for loop is:
your code goes here
endfor
Here, %loop_index can be anything between %a to %z only. On the first iteration, the first value (value1) will be assigned to the loop index. On the second iteration, the second value (value2) will be assigned to the loop index, and so on. You can use the loop index to access the values (value1, value2, …, valueN) one by one inside the loop.
To experiment with the for loop, create a new script file loop1.nsh as follows:
FS0:scripts> edit loop1.nsh
![]()
![]()
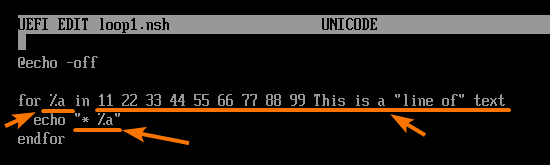
Type in the following lines of codes in loop1.nsh script.
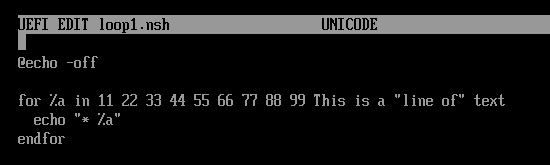
Here, the loop index is %a. The loop values are 11, 22, 33, 44, 55, 66, 77, 88, 99, This, is, a, line of, and text. The loop prints the loop index %a on every iteration.
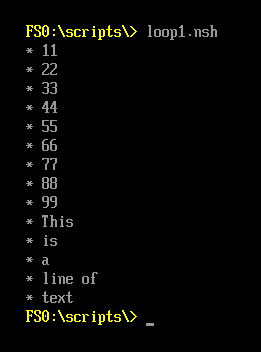
Now, run loop1.nsh script, and it should print the loop values, as you can see in the screenshot below.
Woking with Ranged for Loops:
You can also use ranges in your for loops. If you just want to repeat a code section a specific number of times, a ranged for loop is the right way to go.
The format of the ranged for loop is:
your code goes here
endfor
Here, %loop_index can be anything between %a to %z. On the first iteration, the start will be assigned to the loop index. On the second iteration, start + 1 will be assigned to the loop index, on the third start + 2, and so on until the loop index is equal to the end.
The for loop will iterate end – start + 1 times.
To experiment with ranged for loop, create a new script loop2.nsh as follows:
FS0:scripts> edit loop2.nsh
![]()
![]()
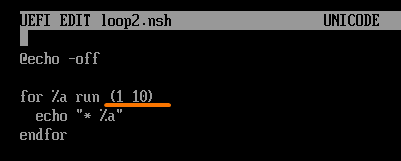
Type in the following lines of codes in loop2.nsh script.
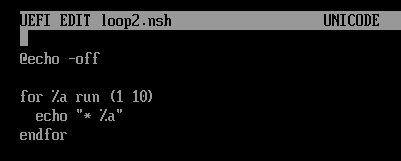
This script is the same as loop1.nsh in the earlier section of this article. The only change is that I have used a ranged for loop here.
The loop will iterate 10 (10 – 1 + 1) times and print the number 1-10.
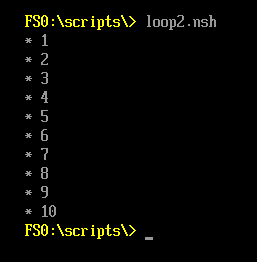
Run the loop2.nsh script and the numbers 1-10 should be printed, as you can see in the screenshot below.
You can use an increment for the ranged loop as well
The format of the ranged for loop with an increment is:
your code goes here
endfor
In the same way, the %loop_index can be anything between %a to %z. On the first iteration, the start will be assigned to the loop index. On the second iteration, start + 1*increment will be assigned to the loop index, on the third start + 2*increment, and so on until the loop index is less than or equal to the end.
The for loop will iterate ((end – start) / increment) + 1 times.
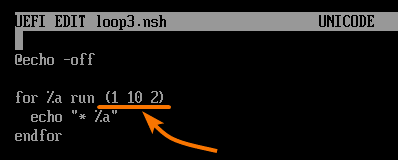
To experiment with increments, create a new script loop3.nsh as follows:
FS0:scripts> edit loop3.nsh
![]()
![]()
Type in the following lines of codes in loop3.nsh script.
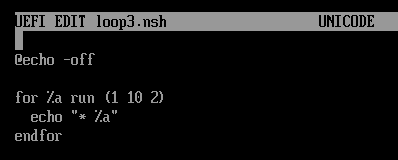
Here, the loop index %a will have the values 1, 3 (1 + 2), 5 (3 + 2), and so on.
So, the loop should print the values 1, 3, 5, 7, and 9. All the odd numbers within 1-10.
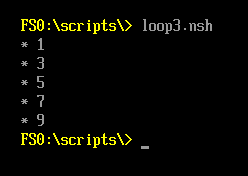
Run the script loop3.nsh, and you should see that all the odd numbers from 1-10 are printed.
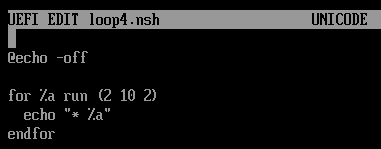
In the same way, create a script loop4.nsh and type in the following lines of codes.
This one is the same as loop3.nsh script. So, I don’t have to explain it.
It prints all the even numbers from 2-10.
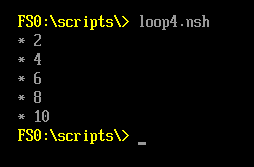
Run the script loop4.nsh, and you should see that all the even numbers from 2-10 are printed.
Jumping in the Code:
You can’t use functions on your EFI Shell scripts. But you can use the goto statement to do the same thing.
To use the goto statement, you will need to label a code section on your EFI Shell script. Once you label a section of code, you can jump to it using the goto statement.
To label a section of code on your EFI Shell script, you can use the following format:
Your code goes here
Then, you can jump to the labeled section of the code from anywhere of your EFI Shell script as follows:
To experiment with the goto statement, create a new script jump.nsh as follows:
FS0:scripts> edit jump.nsh
![]()
![]()
Type in the following lines of codes in the jump.nsh script.
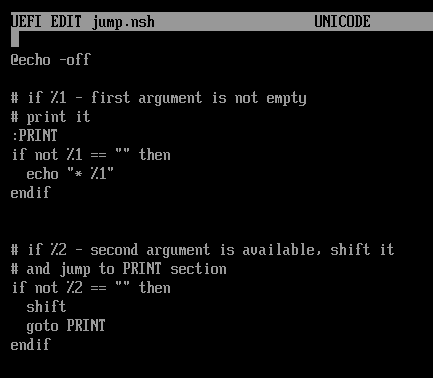
Here, a section of code is labeled PRINT. It checks if the first command-line argument %1 is available. If it is, the value is printed on the screen.
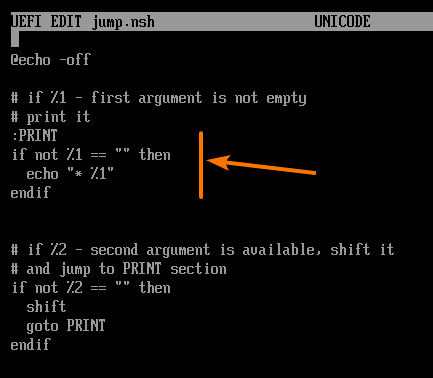
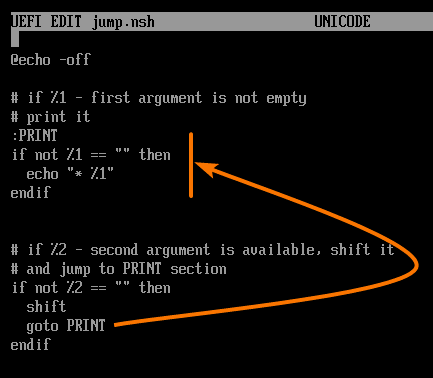
Then, another if statement checks if there’s a second command-line argument %2 available. If it does, the command-line argument is shifted (so, %2 becomes %1), and a goto statement is used to jump to the PRINT label.
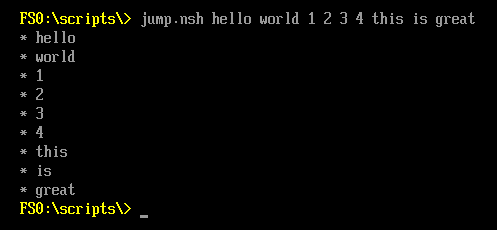
Now, run the jump.nsh script with as many command-line arguments as you can and all of them should be printed, as you can see in the screenshot below.
FS0:scripts> jump.nsh hello world 1 2 3 4 this is great
Conclusion:
In this article, I have shown you the basics of UEFI Shell scripting. First, I started with a simple hello world program. Then, I have shown you how to document EFI Shell scripts with comments, work with environment variables, work with command-line arguments, shifting command-line arguments, decision making with if statement, if-else statement, checking for file/directory existence, terminating shell scripts, checking command success status, for loop, ranged for loop, labeling codes, and jumping to labeled code sections. This article should help you get started with UEFI/EFI Shell scripting.
References:
[1] Unified Extensible Firmware Interface – Wikipedia
[2] Shell Command Reference Manual – Intel
[3] Basic Instructions for Using the Extensible Firmware Interface (EFI)
[5] uEFI Shell scripts (3 of 3) – GlowingThumb
[6] Harnessing The UEFI Shell – Michael Rothman, Vincent Zimmer, and Tim Lewis